 English
 Português
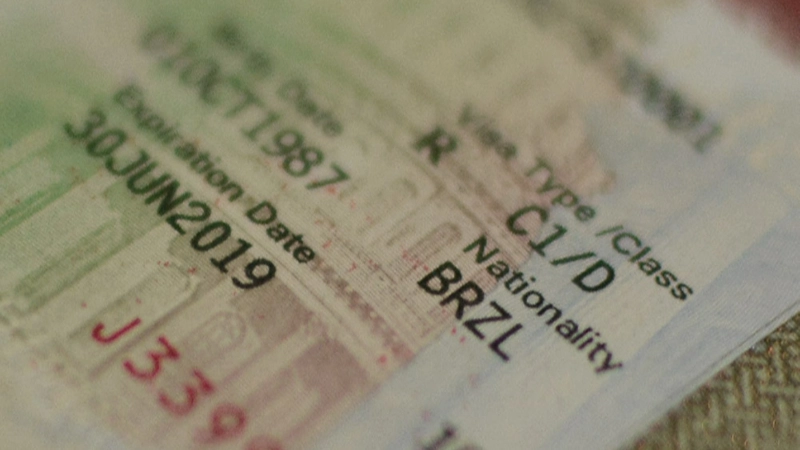
How to fill the DS-160 for the C1/d VISA
We created this tutorial to help you correctly fill out the DS-160 form, which is the first step in applying for the American C1/d visa, which is required for crew members joining a vessel in the United States. While there are many tutorials online about the DS-160, this one is specifically designed for seafarers.
Ready to get started? Access the U.S. Consulate website by clicking the link below:
ATTENTION:
You do not need to pay an agency or person to fill the form for you.
It should take less than 30 minutes to fill the form by yourself.
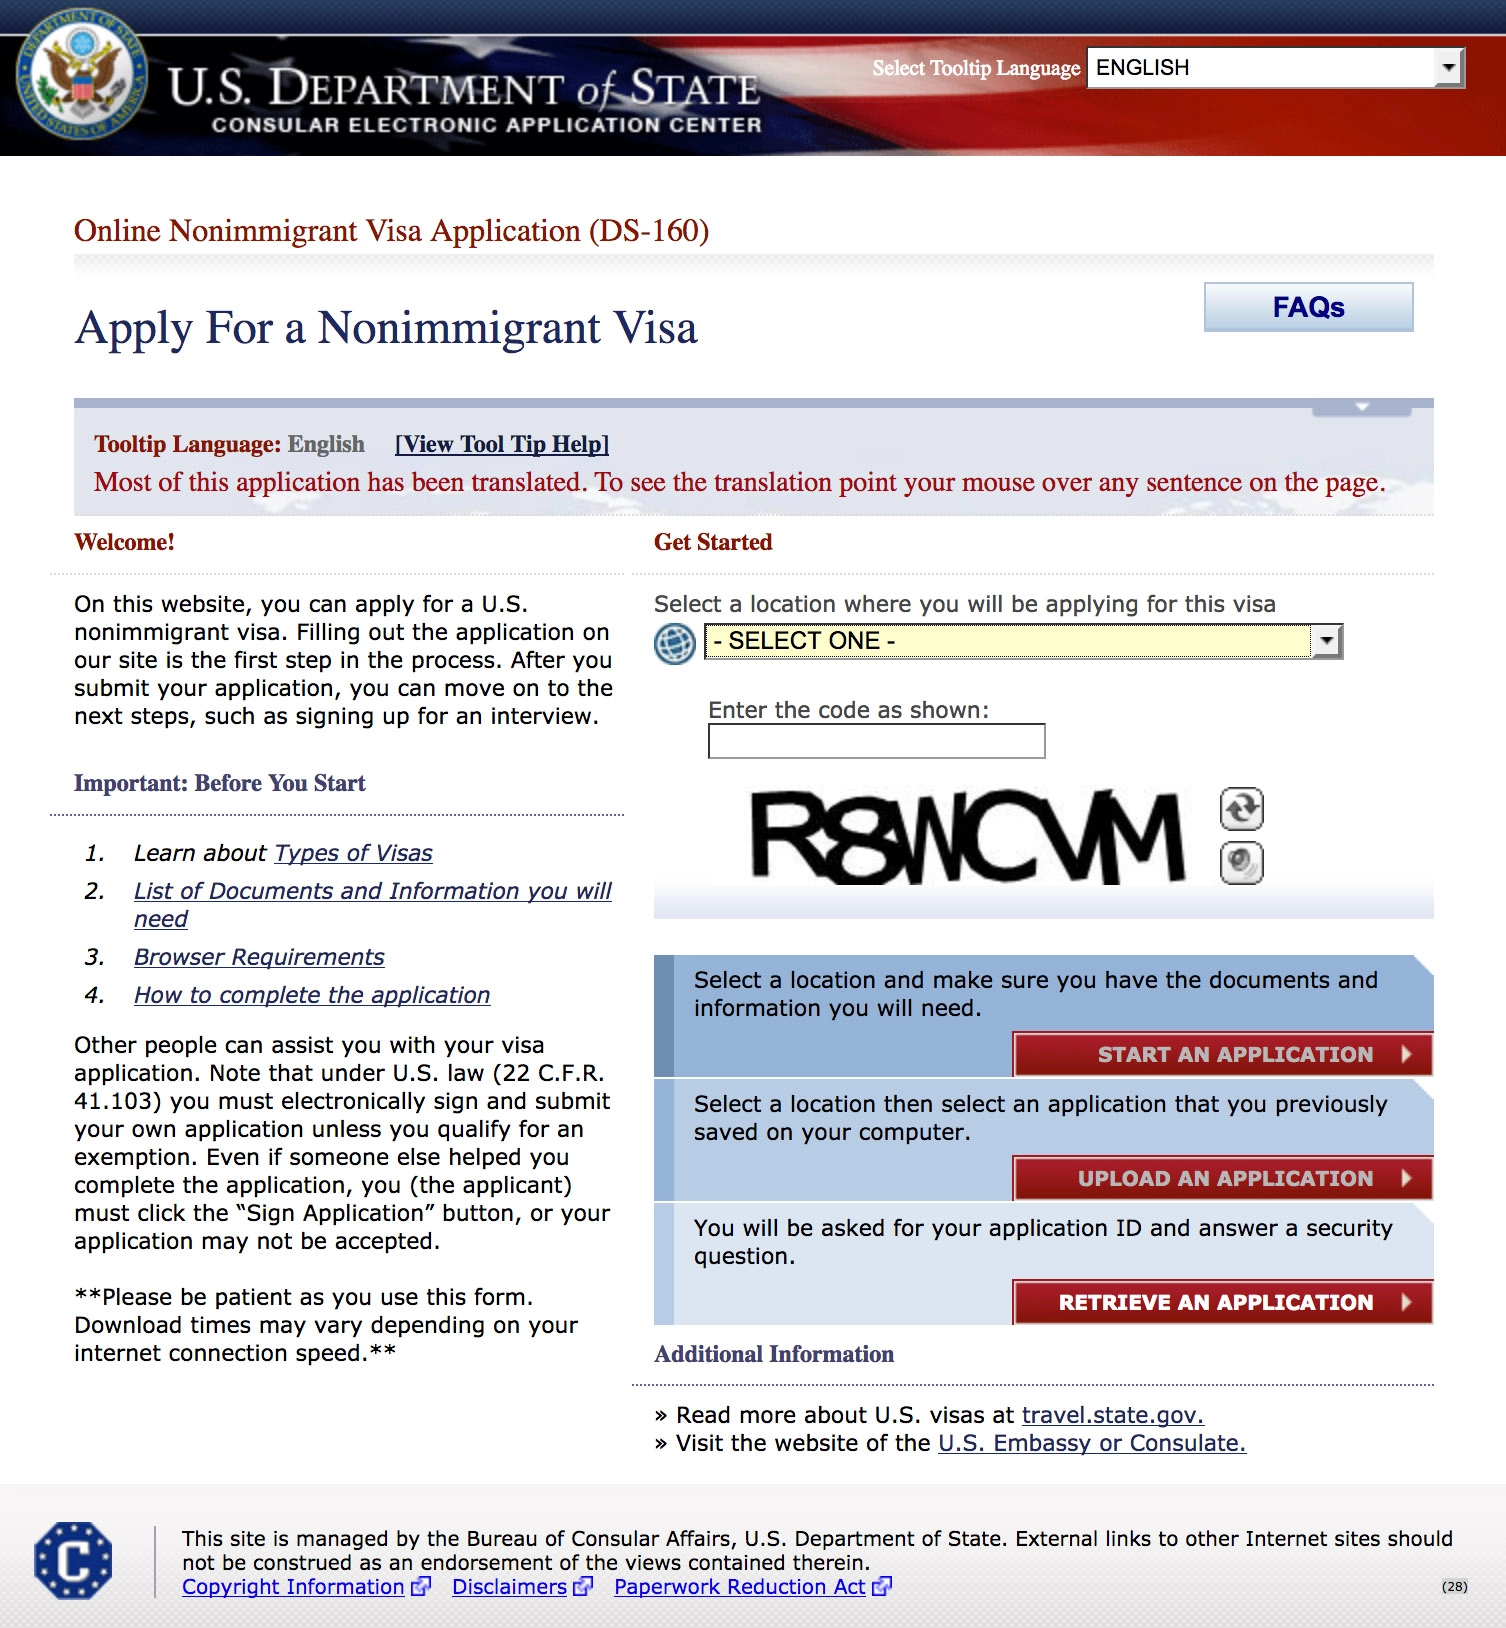
Apply for a Nonimmigrant Visa
This is the initial page where you’ll begin filling out the form. Before starting, make sure you have all your personal documents ready, including but not limited to: your national ID, passport number, full residential address, your company’s complete address, the name of the ship you’ve been assigned to and its identification number (this can be found on your Letter of Employment).
Since the entire website is in English, you can select a different language for the tool tip help at the top-right corner if needed. However, if you follow our instructions carefully, you should have no trouble.
The first step is selecting the city where you’ll apply for your visa. Choose the location that is closest to where you live. Then, complete the captcha to proceed to the next step.
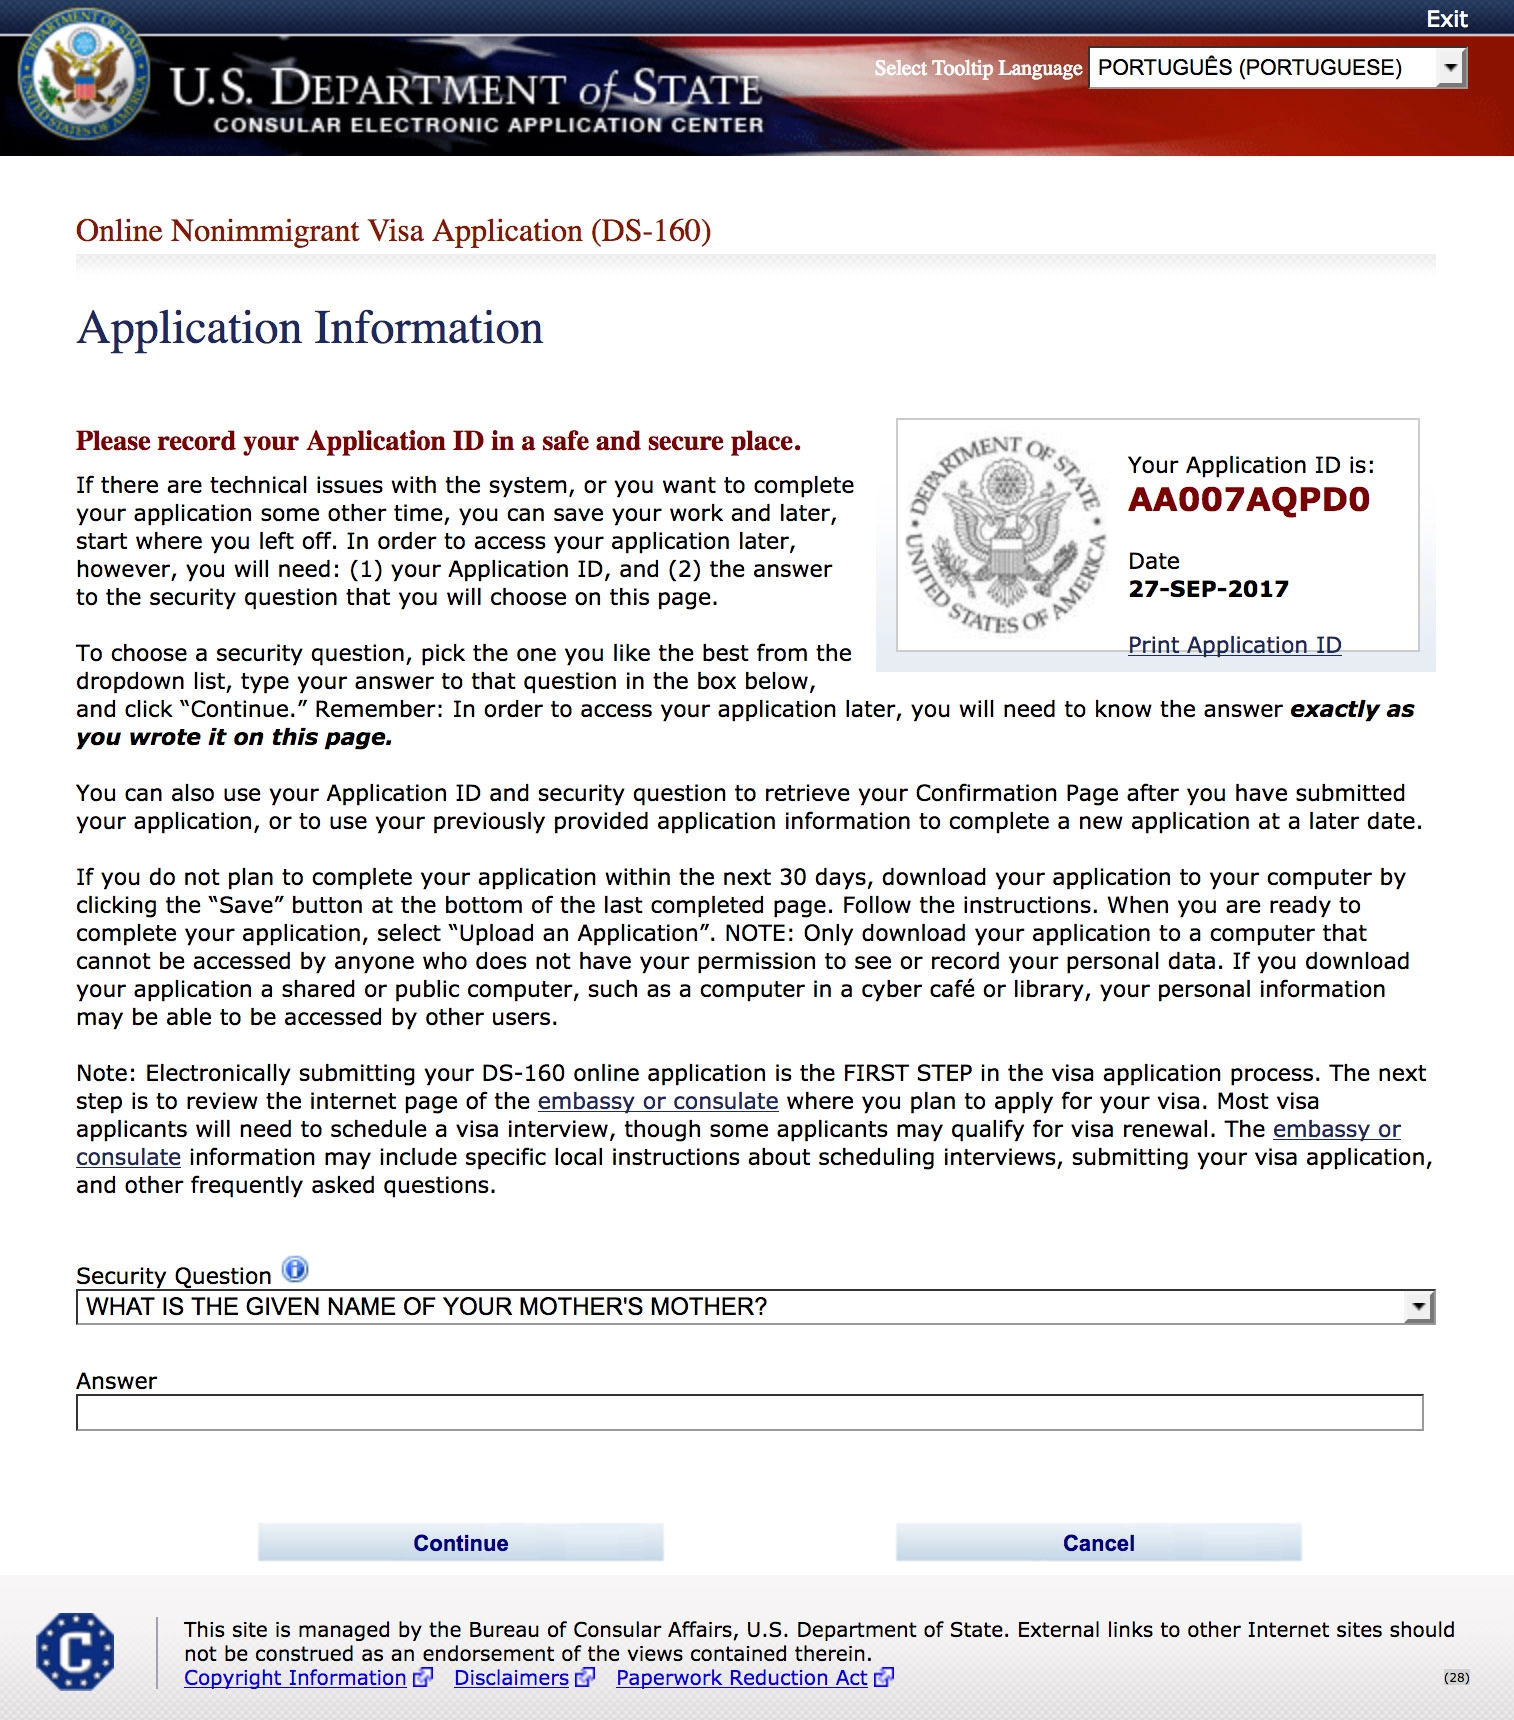
Application Information
On this next page, you’ll be given a serial number known as your Application ID. This number is important because if you lose your internet connection or need to pause and return to the form later, you won’t have to start over. Simply enter your Application ID and the answer to your security question to continue from where you left off.
Example:
Your Application ID is: AA007AQPD0
The security question and answer are only used to resume your application. You won’t need them after the form is completed, so choose something simple and memorable to avoid delays later.
Personal Information 1
Proceed by entering your personal information exactly as it appears in your passport. Do not include any name changes due to marriage, divorce, or other reasons—only use the name printed on your passport.
You’ll then be asked if you have ever used another name. If you have, select YES, and an additional field will appear for you to enter the previous name. If not, select NO and continue. Unless you have a telecode name (a name written in special characters), you should also answer NO to that question as well.
Continue filling in your basic personal details such as gender, marital status, city and country of birth, and your date of birth.
From this point on, once you finish a page, click NEXT to continue. If you need to pause at any time, click SAVE. This will close the form, and you can resume later using your Application ID and the answer to your security question.

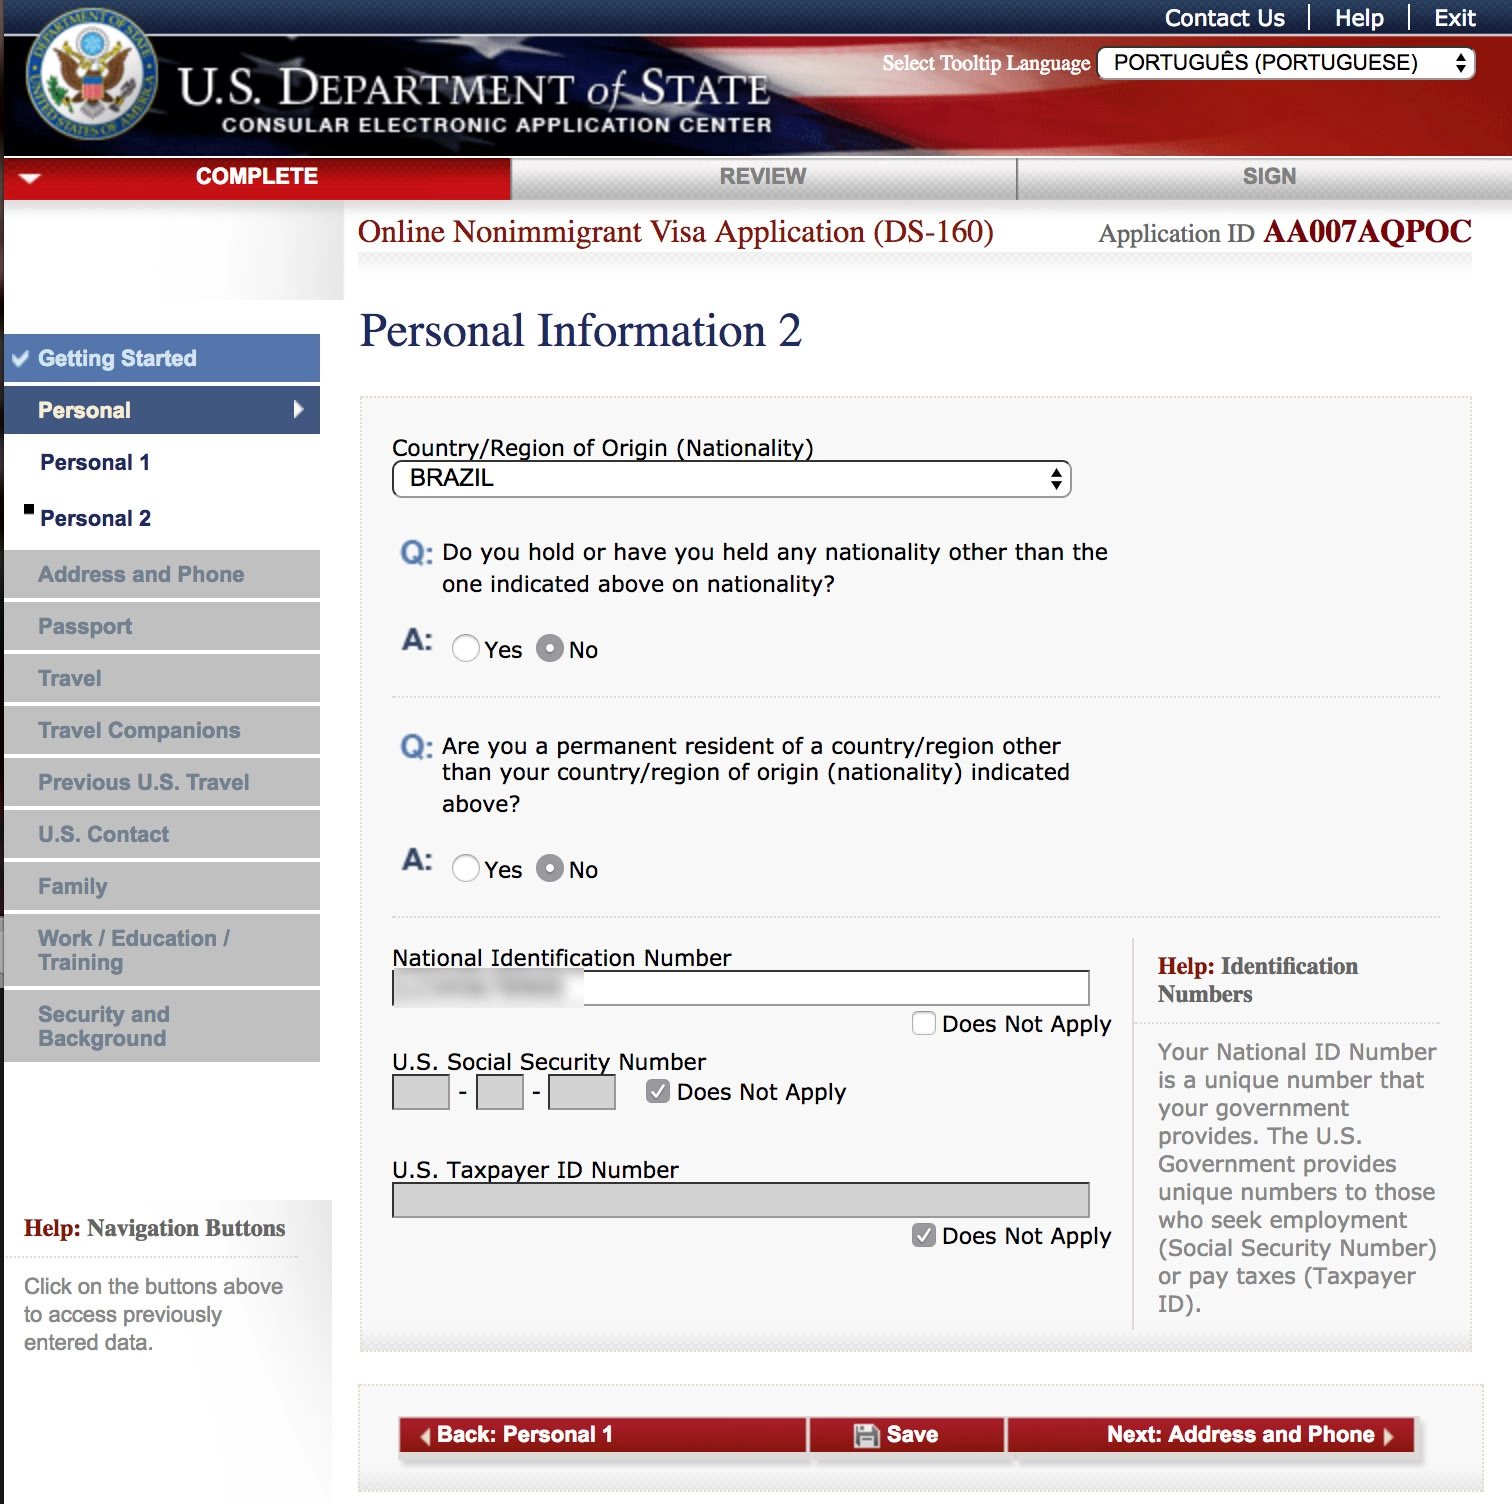
Personal Information 2
Continue entering your details and select your nationality. If you hold more than one nationality, a new field will appear for you to enter your second nationality as well.
The next question will ask whether you currently live in a country different from your country of birth. Answer accordingly.
After that, you’ll need to enter your National Identification Number, which is your government-issued ID number. Type the number without punctuation or symbols.
The final two fields ask whether you have a U.S. Social Security Number or a U.S. Taxpayer Identification Number. Since you are applying for a C1/D visa as a non-U.S. citizen, these should not apply. Simply select “Does Not Apply” for both, and the fields will turn gray automatically.
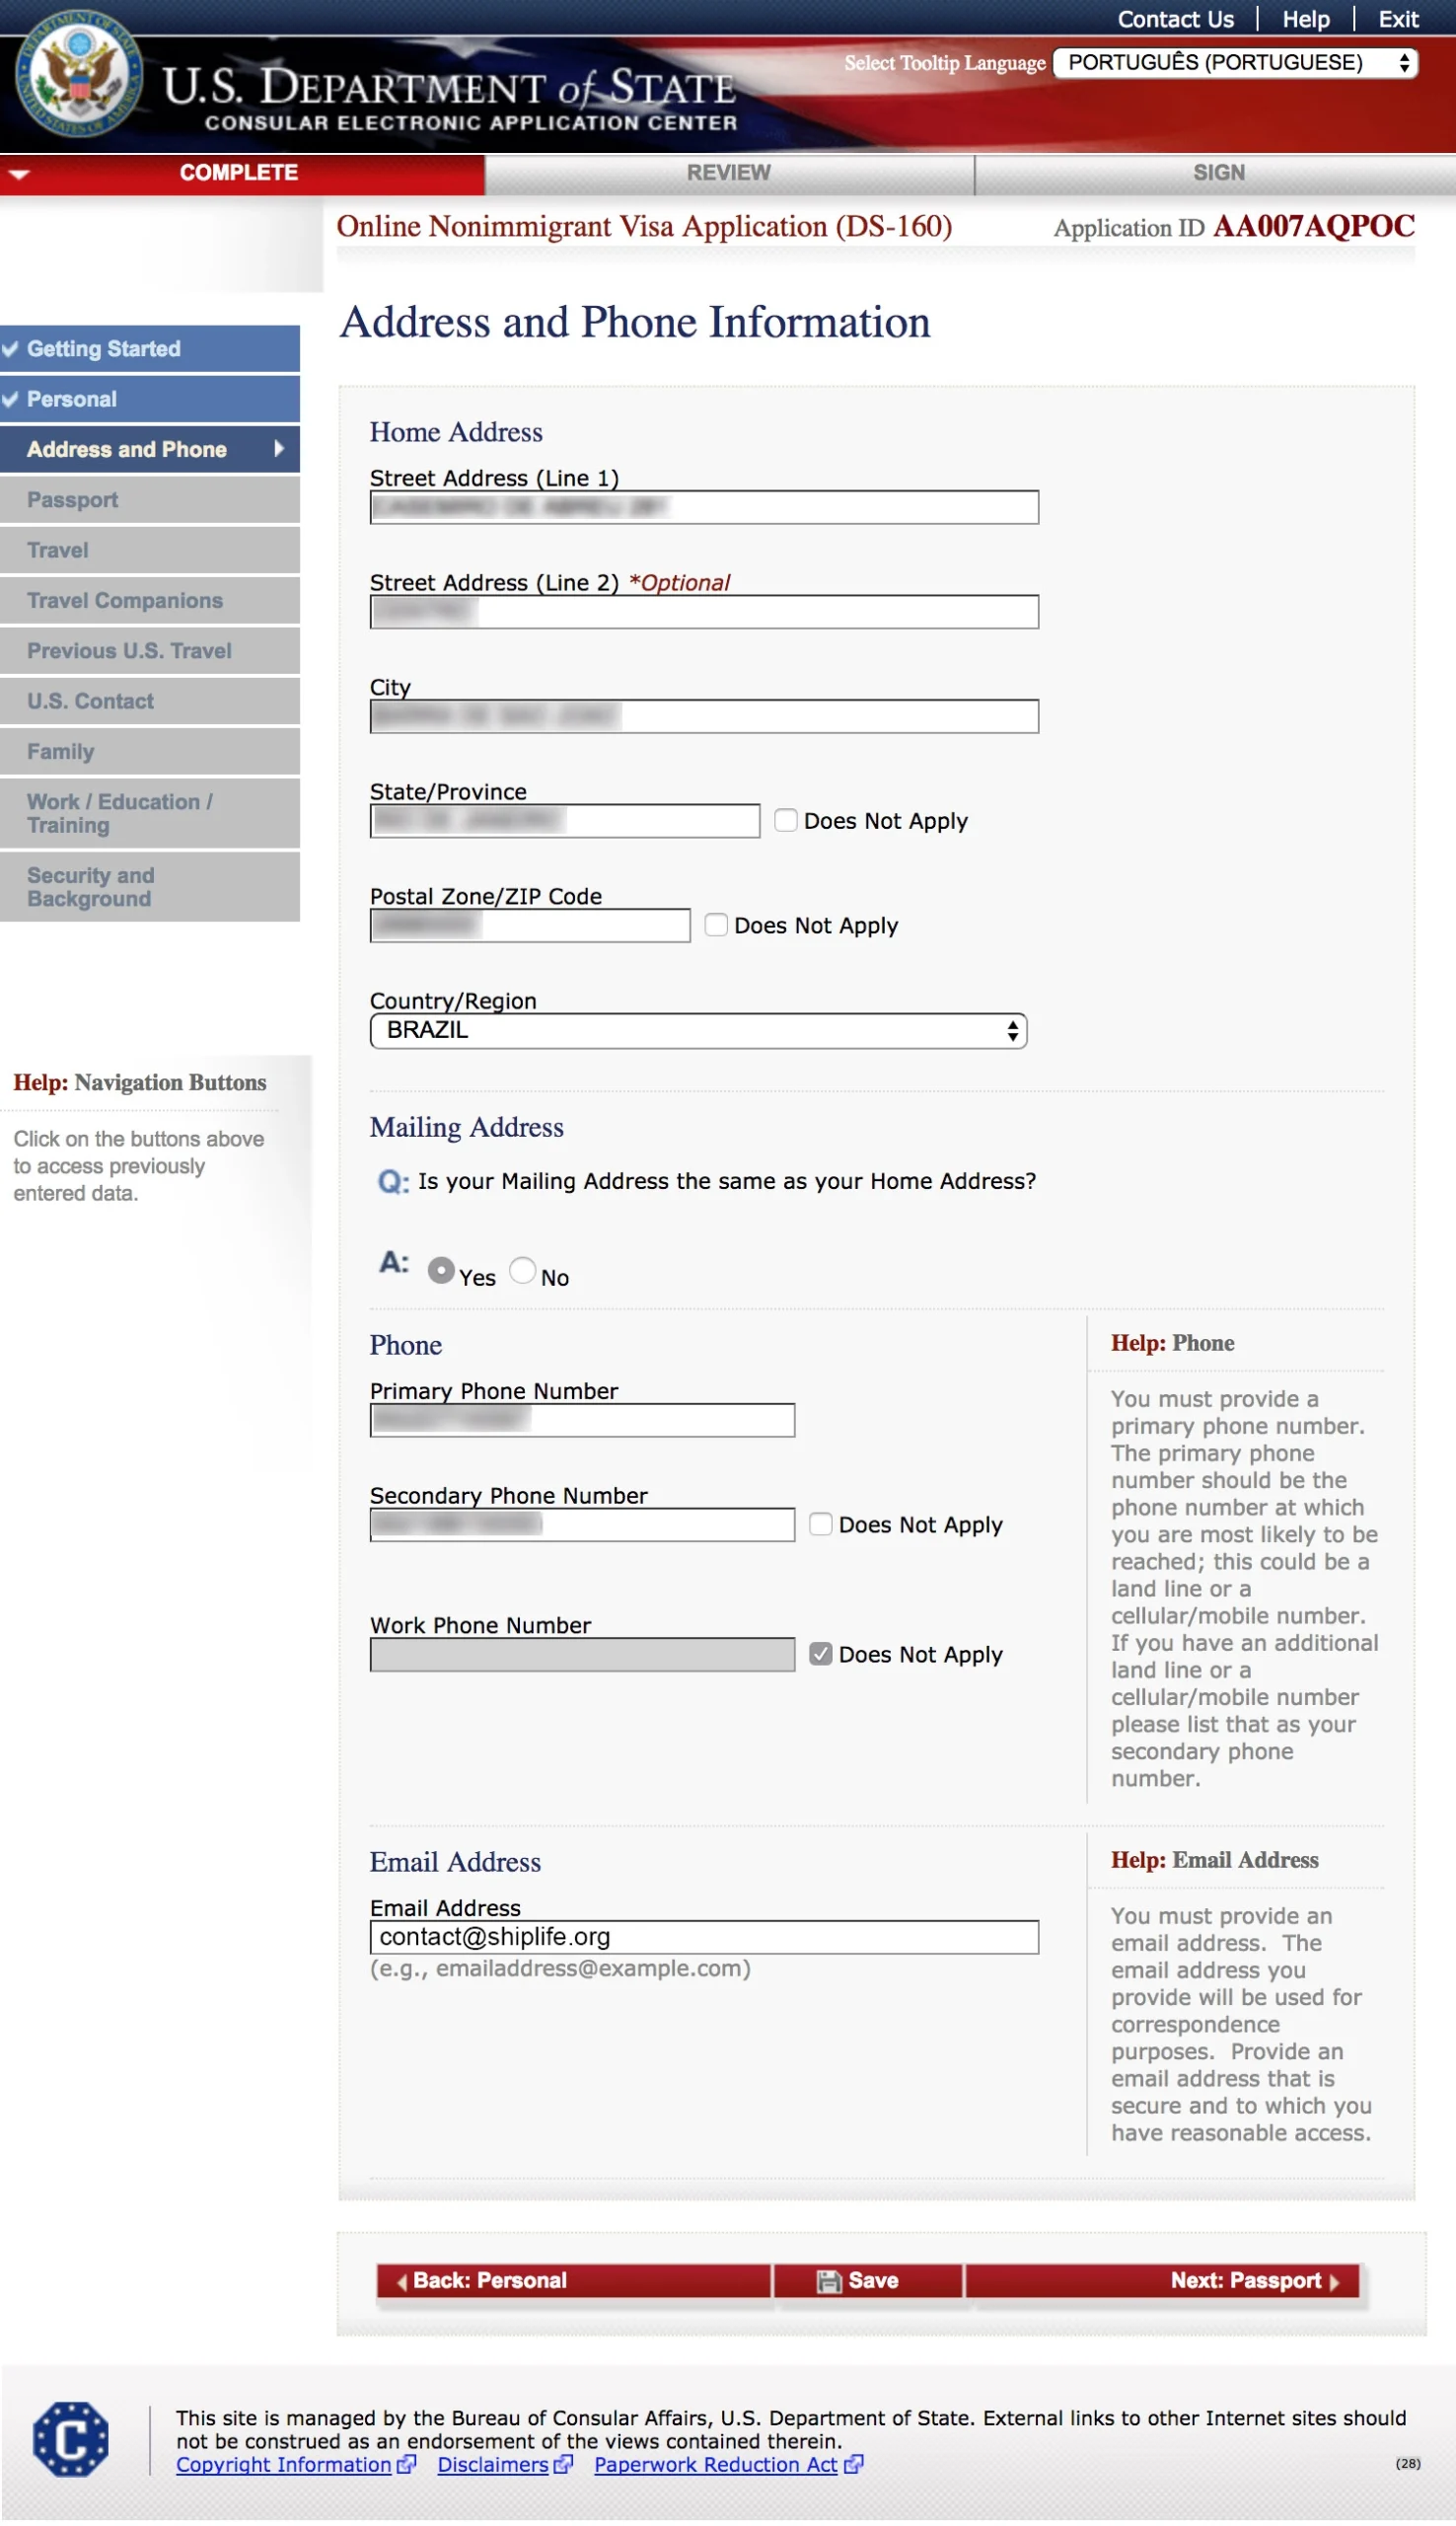
Address and Phone Information
Next, you’ll need to fill in your complete home address.
For the Mailing Address section, indicate whether your mailing address is the same as your home address. If you want your passport returned to your home address after your visa is approved, or if you don’t have a different mailing address, simply select YES. If you do receive mail at a different location, select NO and provide the alternative address.
Enter your phone numbers, just in case someone from the embassy or consulate needs to contact you, though it’s very rare. Most of the communication regarding your visa status will be done through email, so make sure to enter a valid and correct email address.
Once you’re done, double-check all your information, as this page is particularly important. When everything looks right, click NEXT to proceed.
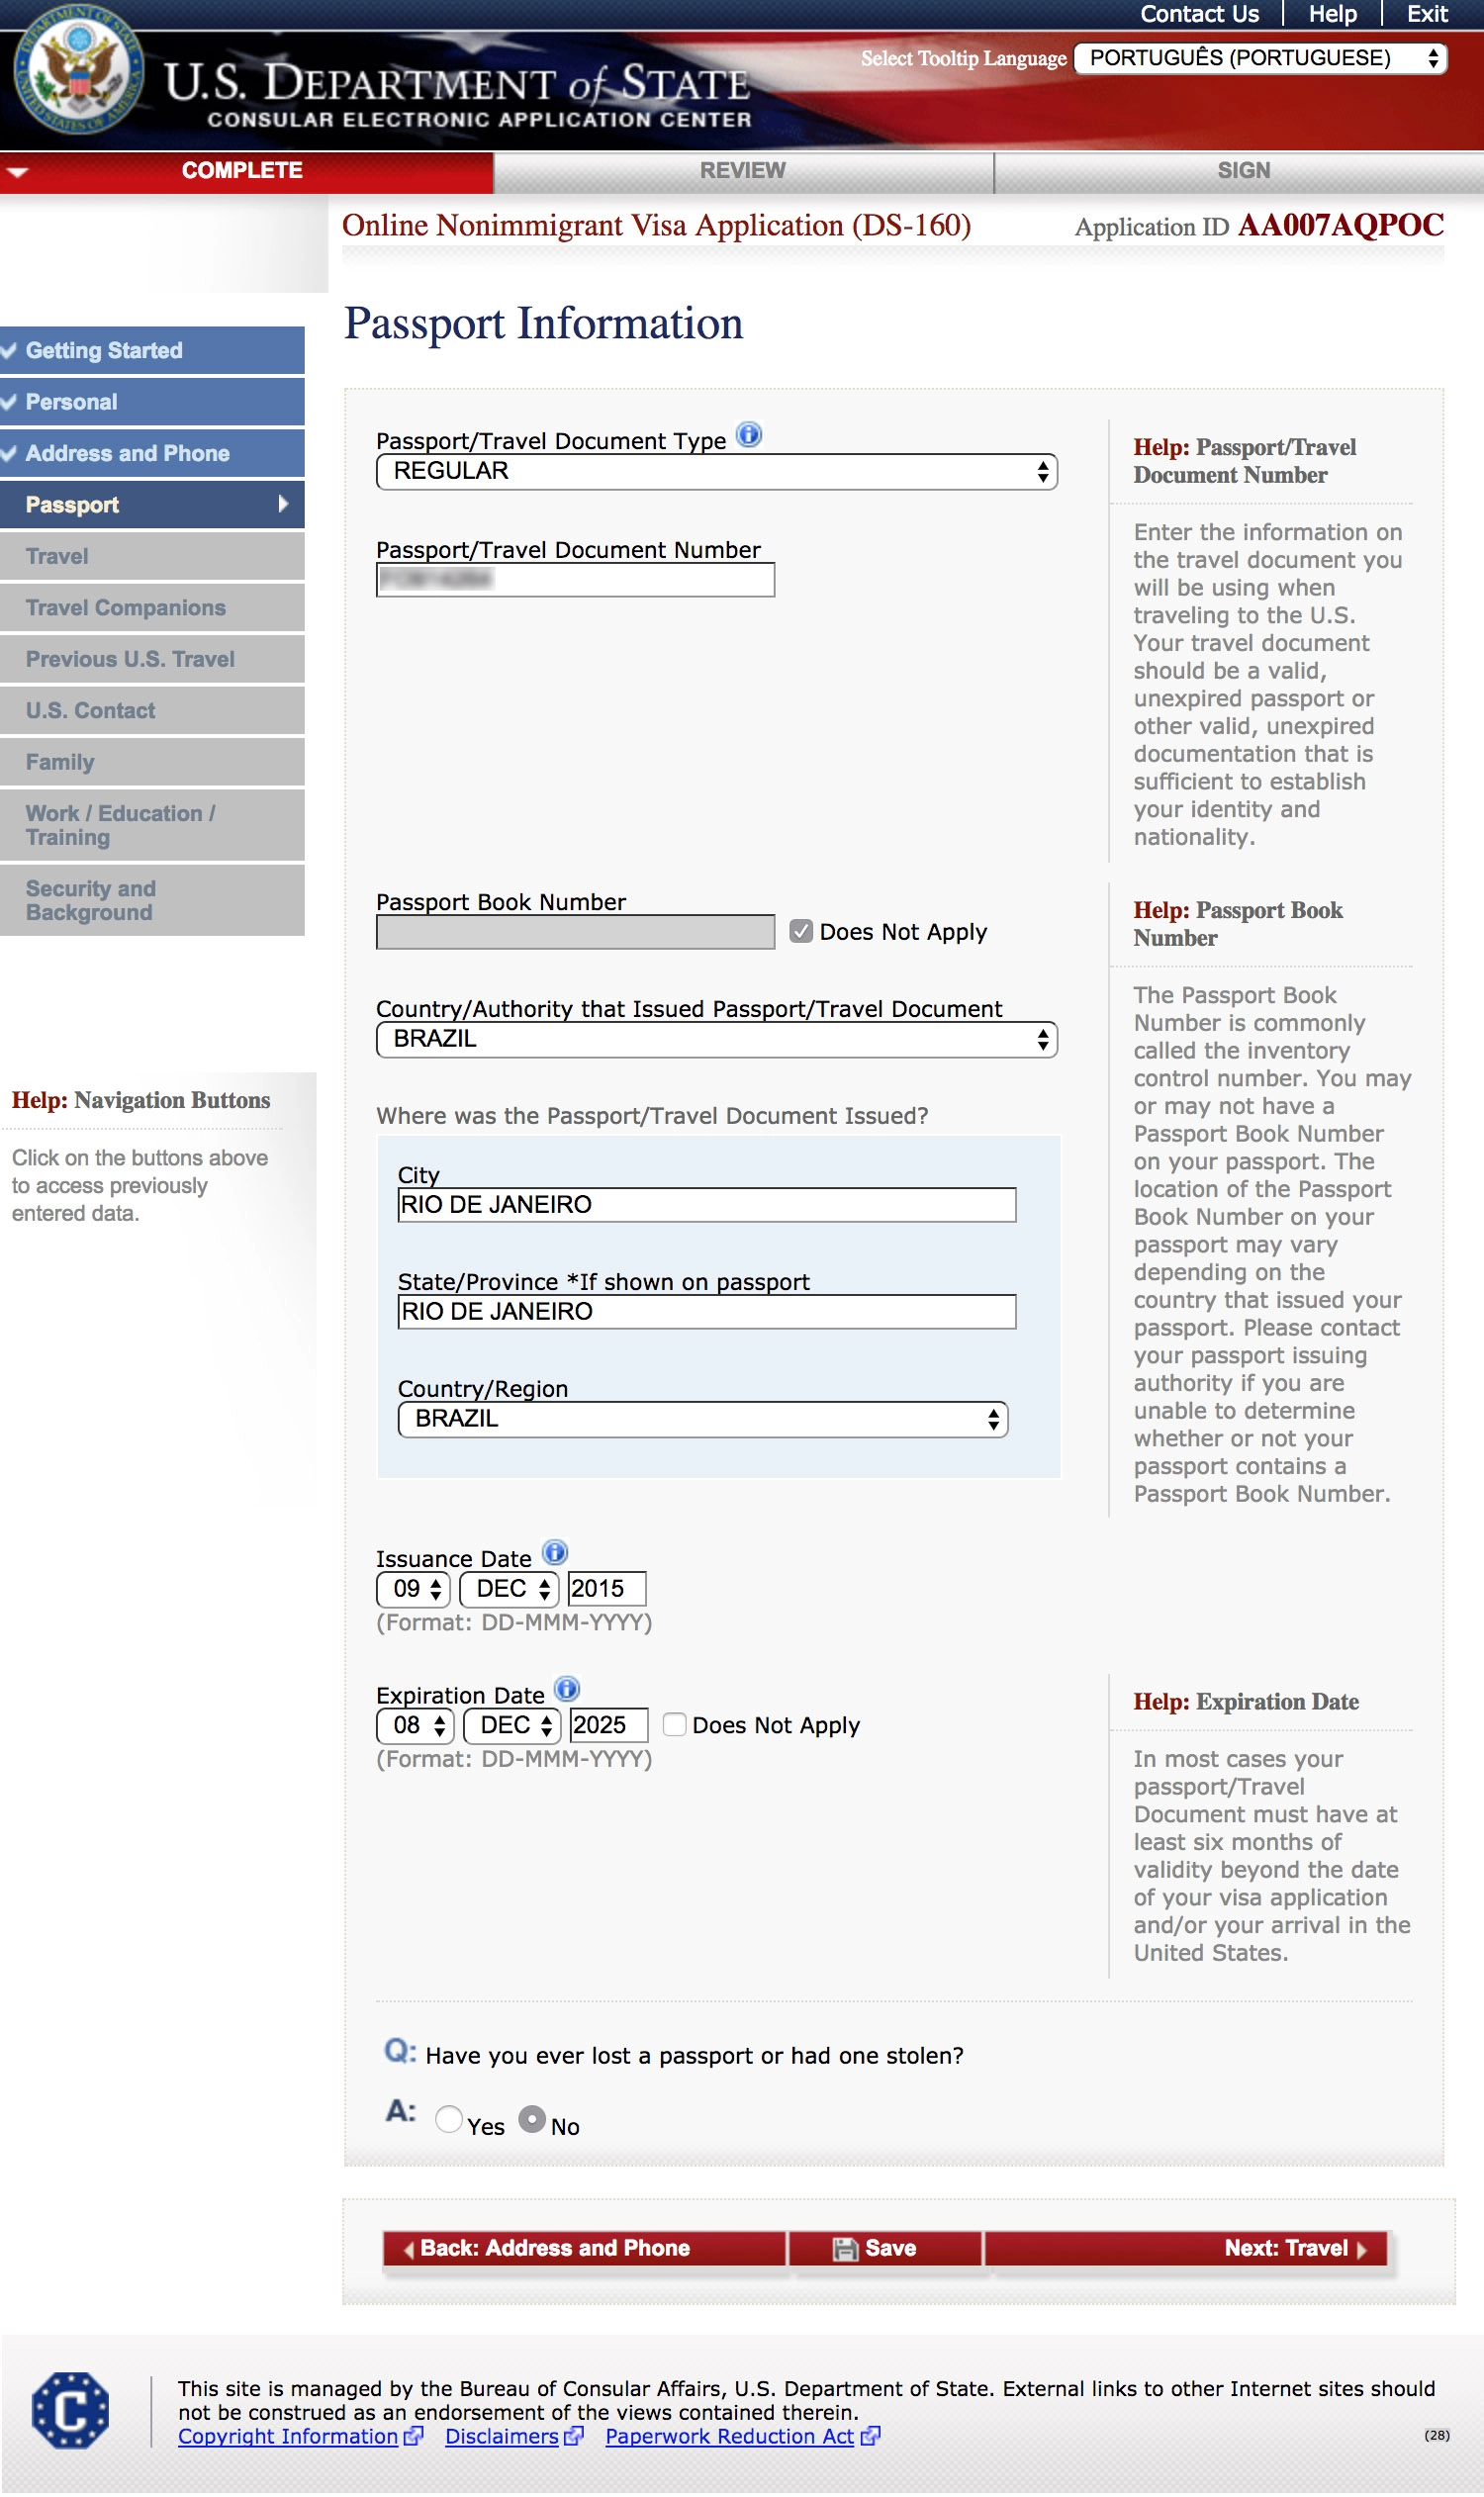
Passport Information
We’ve now reached the Passport Information section. Start by selecting that you have a REGULAR passport. Then, enter your passport number exactly as it appears. Example: FA458798.
For the Passport Book Number, most applicants should select Does Not Apply. Only fill it in if your passport specifically lists a book number.
Next, select the country that issued your passport. If your passport was reissued while you were abroad, select the country where it was reissued. Otherwise, select your home country.
Enter the Issue Date and Expiration Date, both of which are printed on your passport.
The final question on this page asks whether your passport has ever been lost or stolen. If it hasn’t, simply select NO and proceed. If it has, you’ll be prompted to enter additional details such as the old passport number and relevant information.
Once completed, review everything carefully and click NEXT to move on.
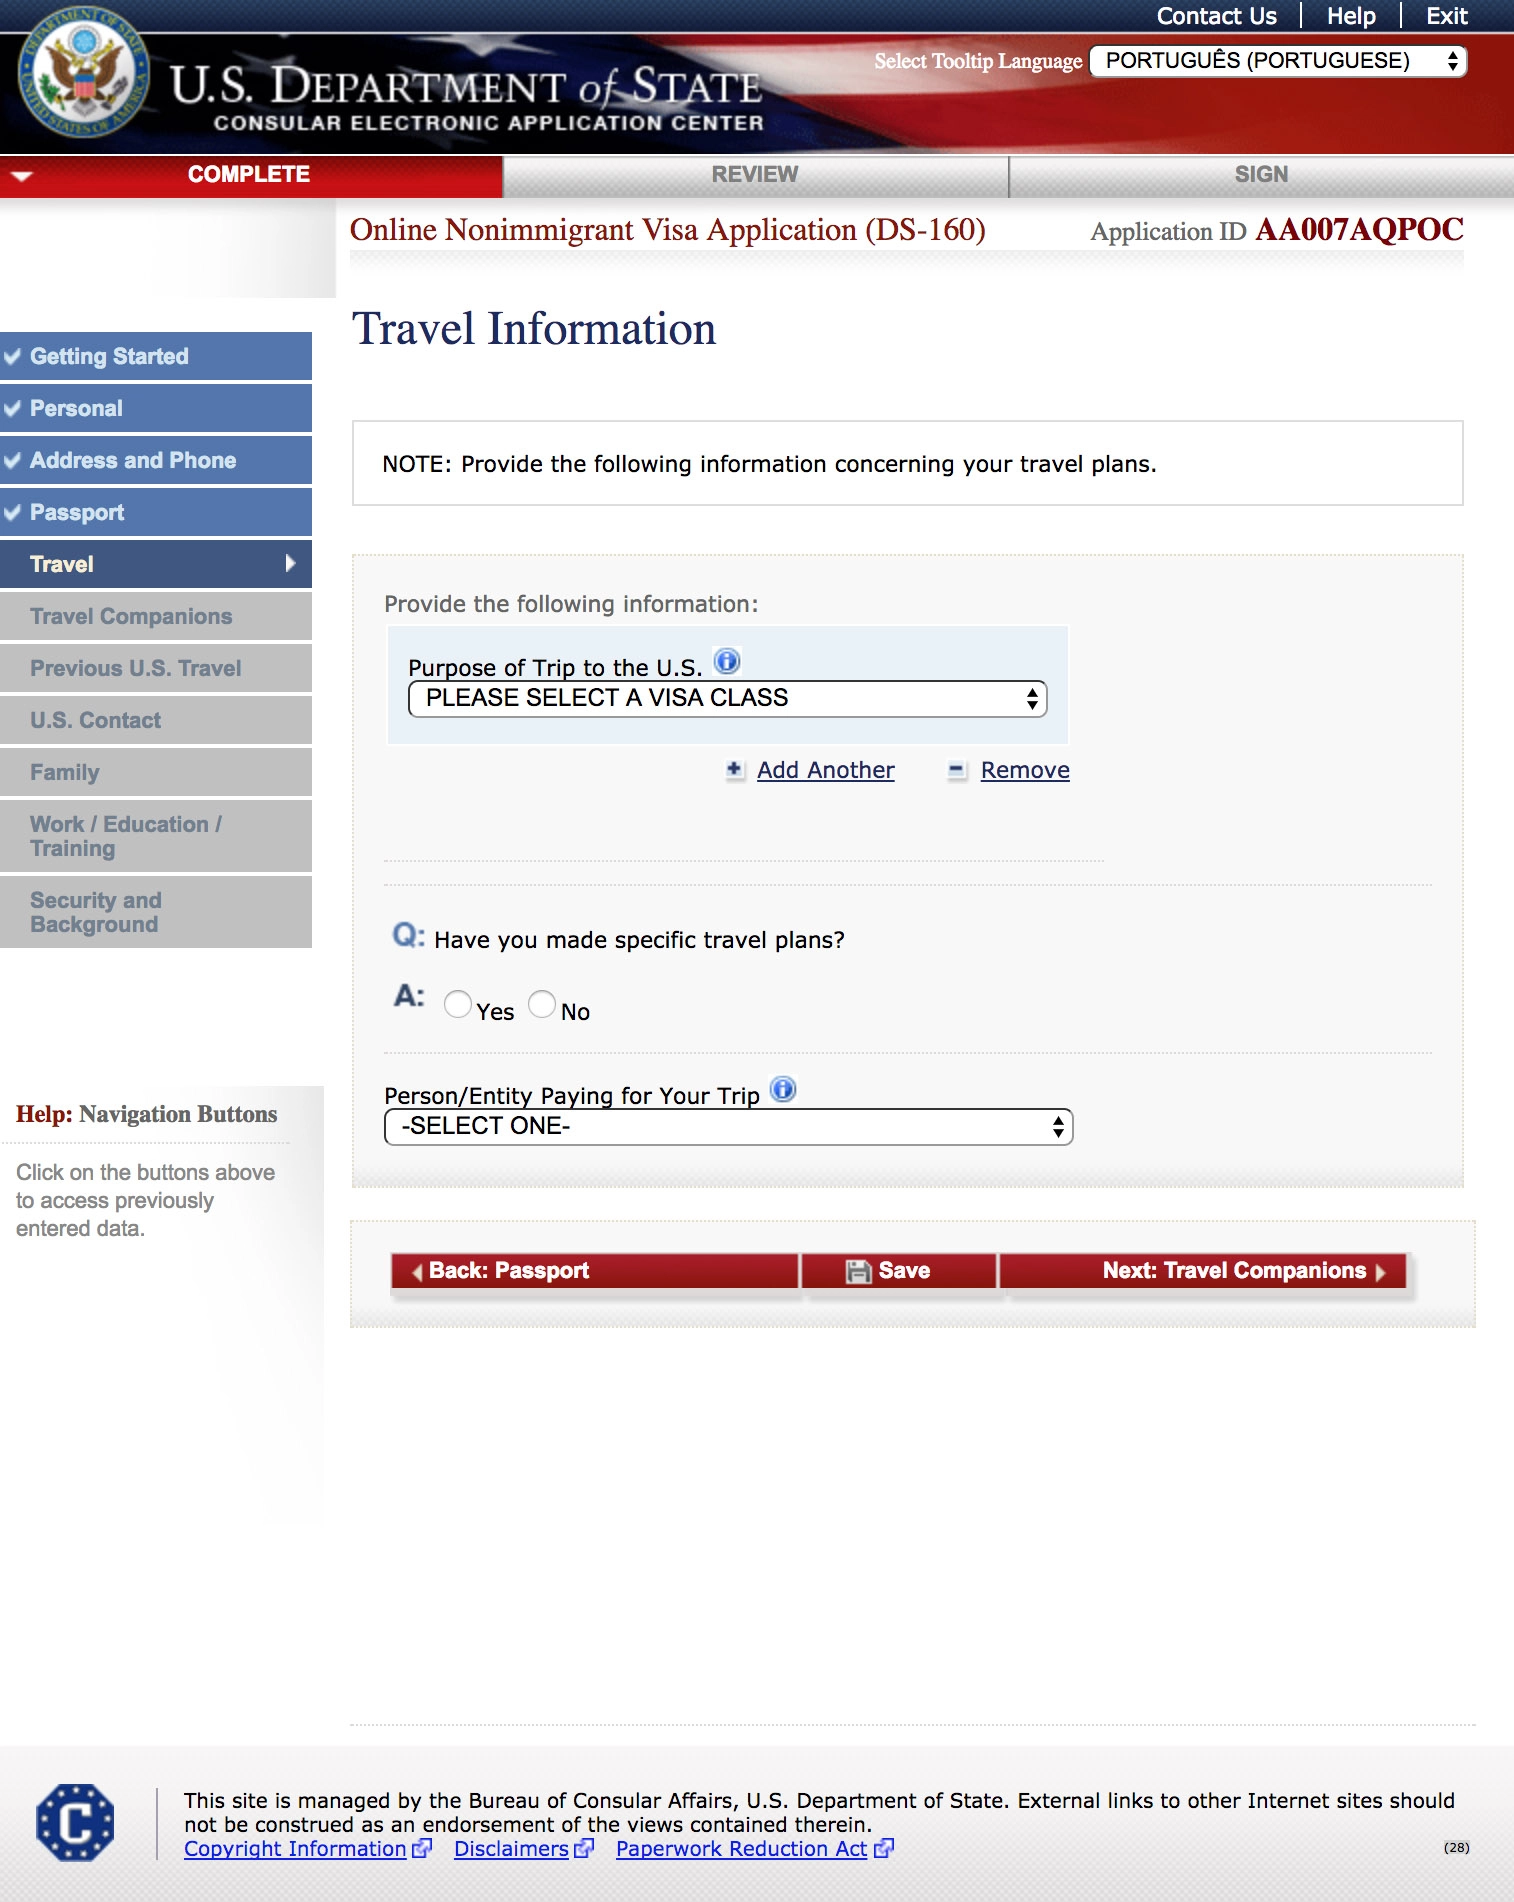
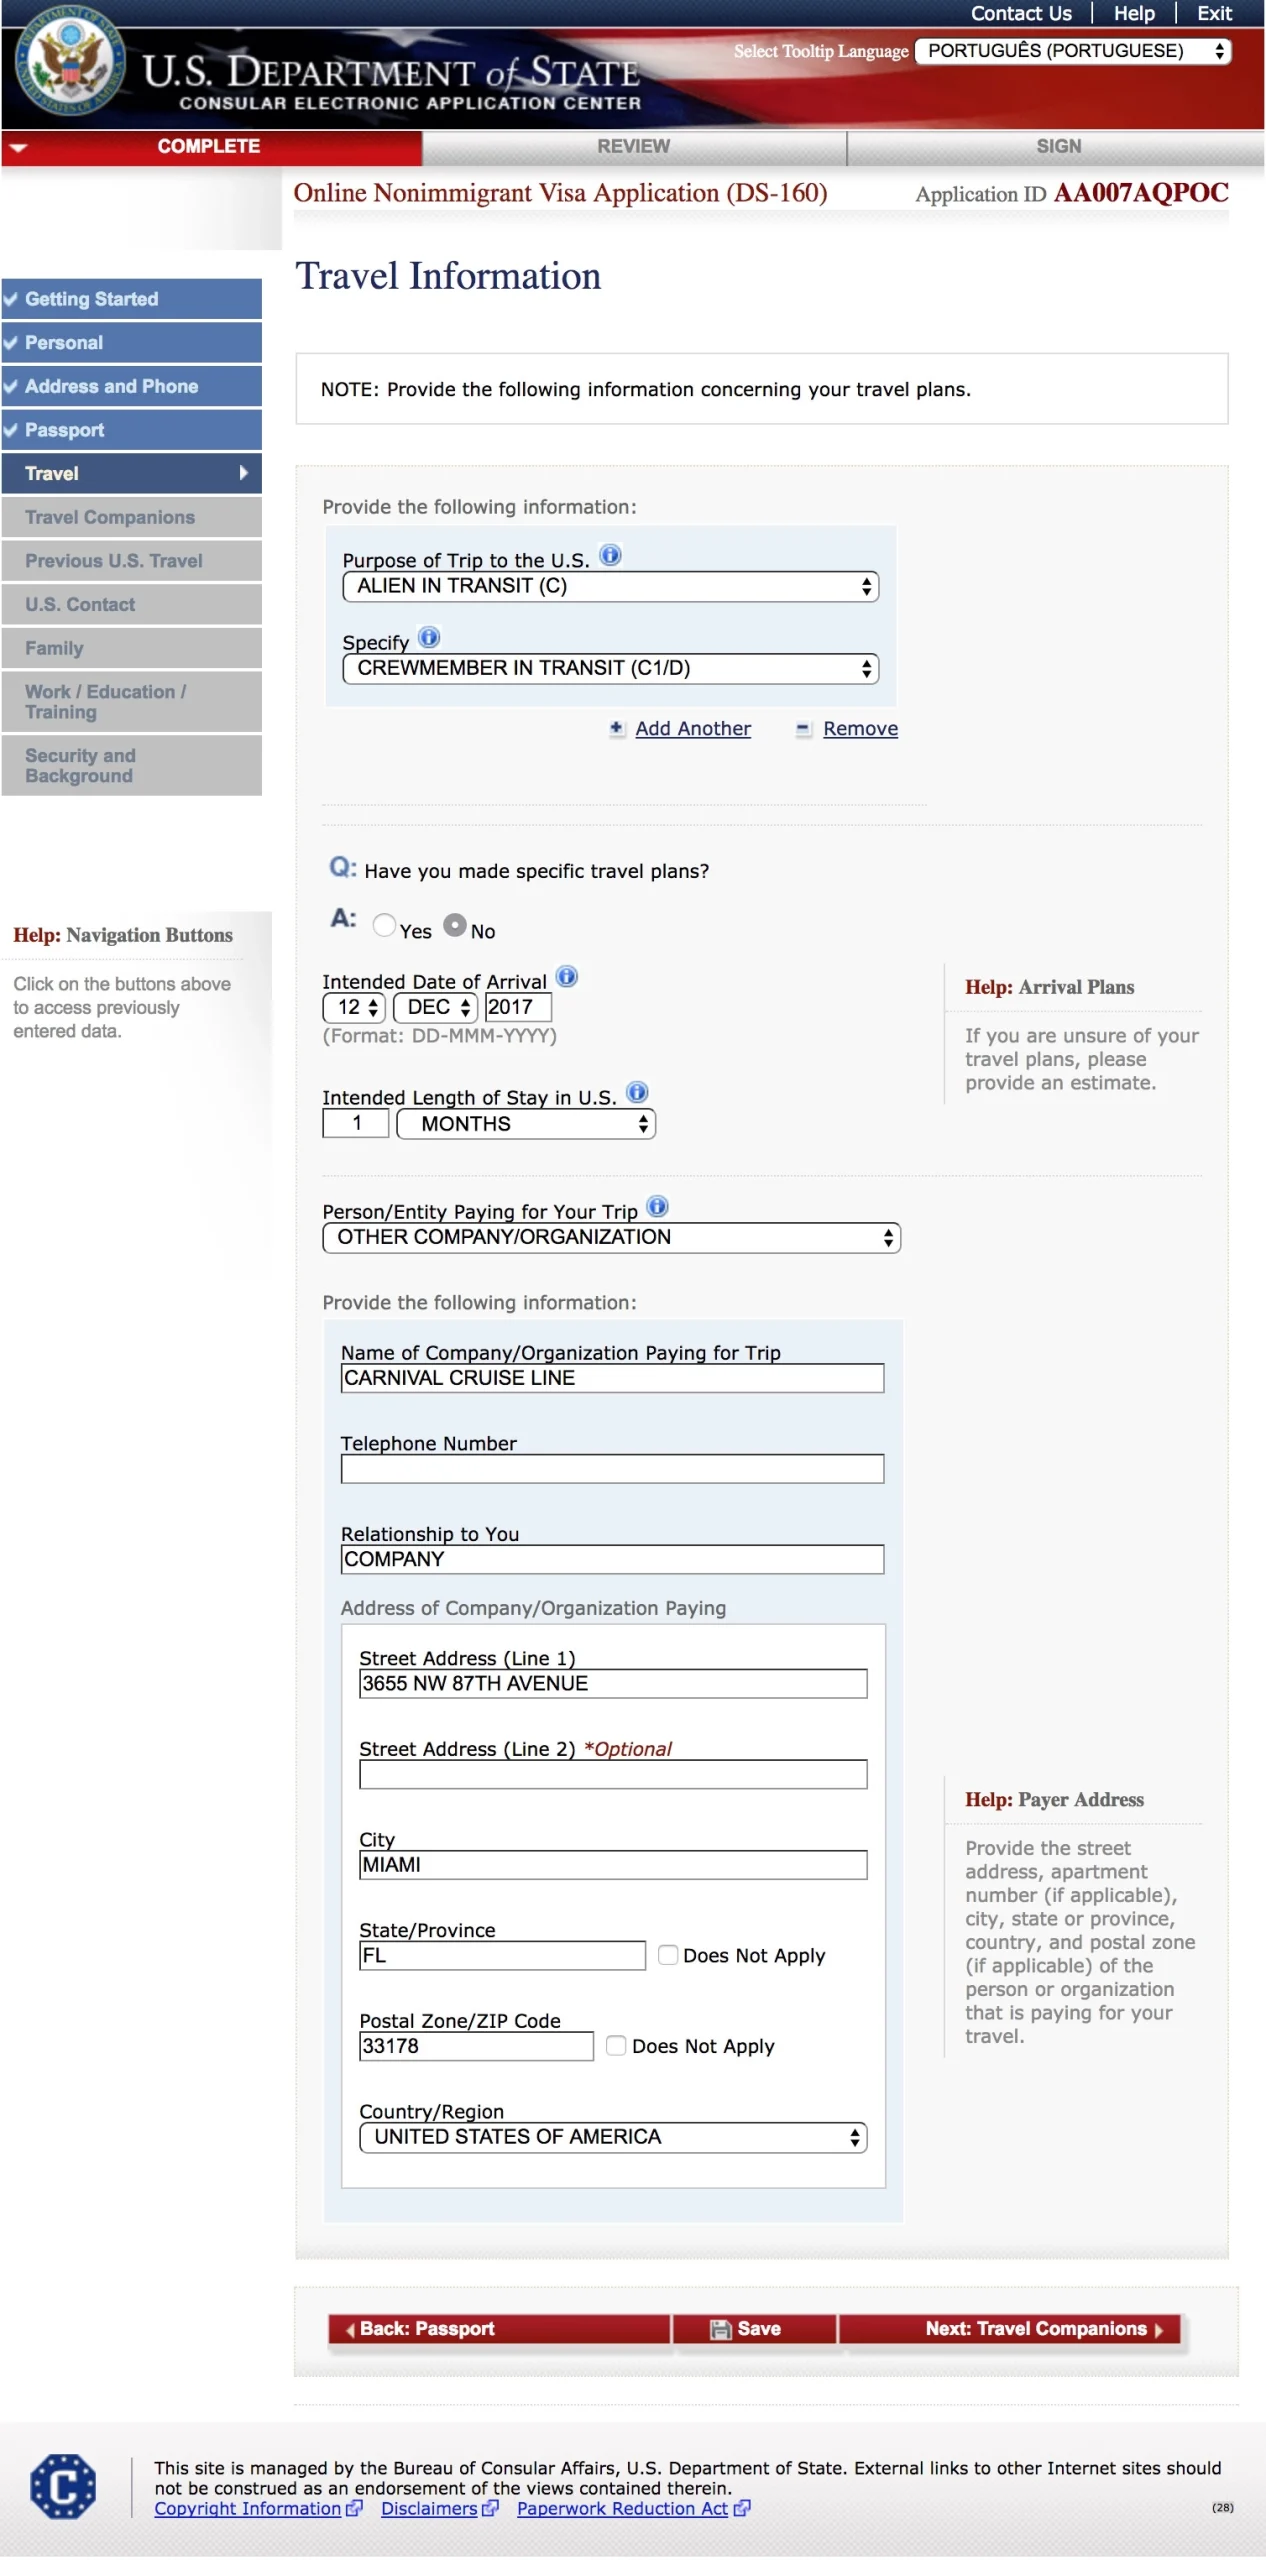
Travel Information
Please pay attention to this part as it is very important!
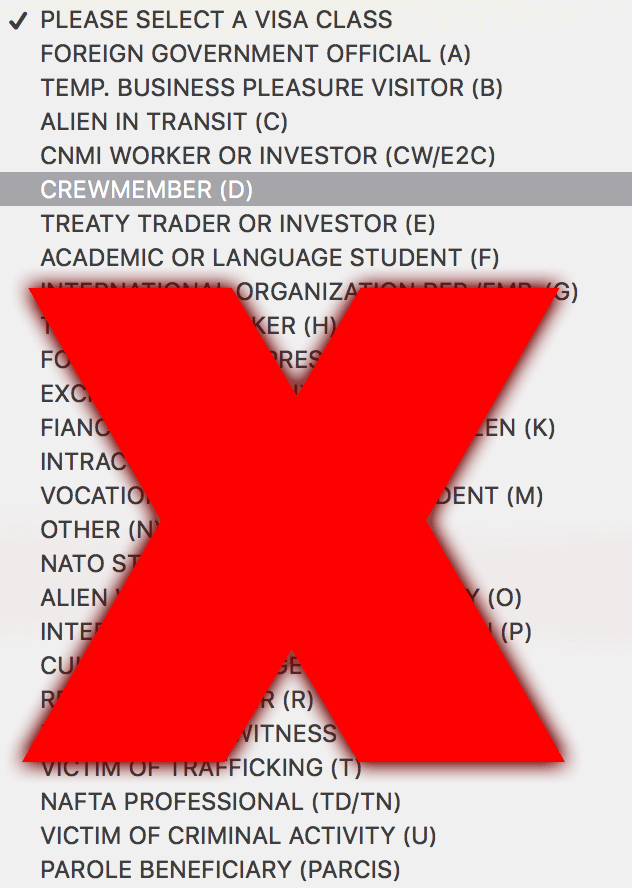
Purpose of Trip to the U.S.: In this section, you must select the correct reason for your visit to the United States. Many applicants make a mistake here and choose the wrong option, which can result in a denied visa.
As explained earlier, this tutorial is specifically for seafarers applying for the C1/D visa, not for the one labeled D – CREWMEMBER only. Do not select the D visa by itself, or your application will likely be rejected.
Here’s how to do it correctly:
1.First, select ALIEN IN TRANSIT (C) from the list.
2.Then, a new dropdown field will appear—select CREWMEMBER IN TRANSIT (C1/D).
This is the correct visa classification for seafarers joining a vessel in the U.S.
![DS160 - First select [C]](https://shiplife.org/24/wp-content/uploads/2025/04/DS160-09.webp)
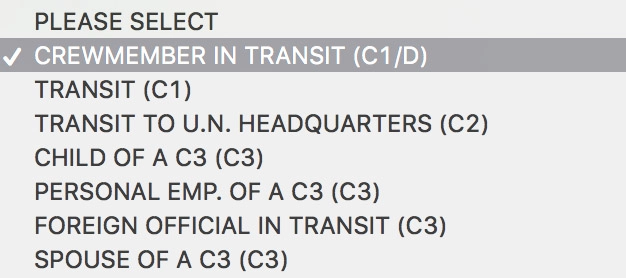
Please double check if you selected "C1/D" before proceeding.
Have you made specific travel plans?
Select “No”, as you will be joining a cruise ship or yacht and not staying in the U.S. for leisure or tourism purposes. Alternatively, if the company have issued you a hotel, you can choose “Yes” and then type its name and address.
Intended Date of Arrival:
Refer to your Letter of Employment and enter the date listed there. In most cases, it should be one day before your scheduled ship joining date.
Intended Length of Stay in U.S.?
Select 1 Months*
NOTE: Although some suggest choosing “less than 24 hours” because the C1/D is a transit visa, this is technically incorrect. The C1/d visa allows crew members to remain in the U.S. for up to 29 days in transit before joining a vessel. The most accurate and acceptable choice here is 1 months, which covers all scenarios without issue.
Person / Entity Paying for Your Trip:
• If you’re covering your flight costs, select Yourself or the individual providing the funds.
• If the company is paying for your airfare, select “OTHER COMPANY / ORGANIZATION” and type the company’s full name and address, as listed in your Letter of Employment.
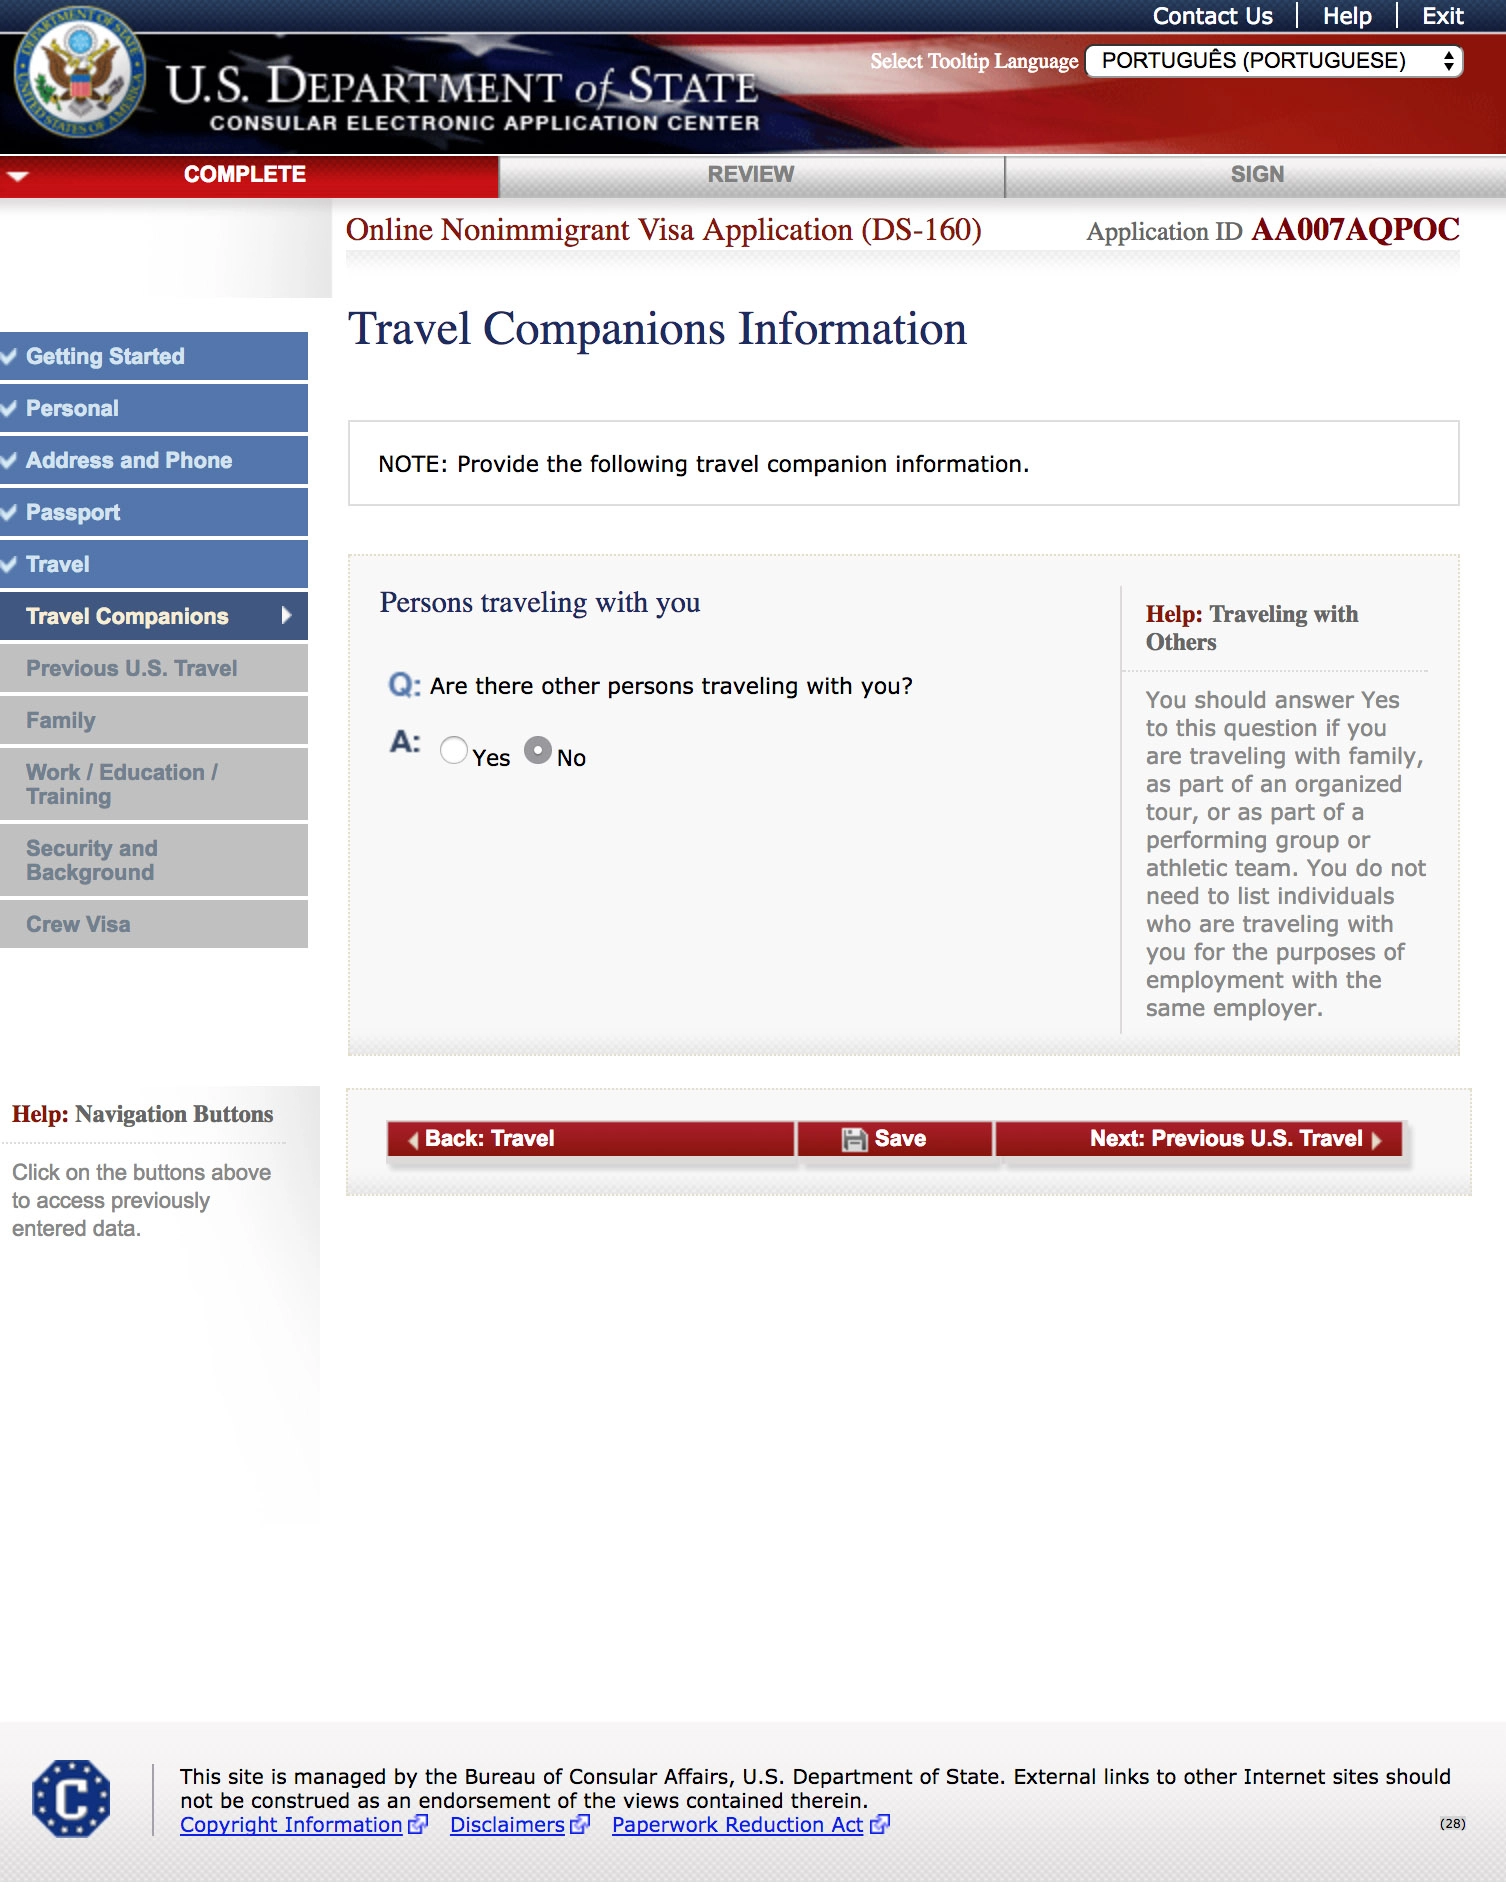
Travel Companions Information
We’re halfway there, so let’s keep going:
Are there other persons traveling with you: No
And then click NEXT.
Previous U.S. Travel Information
Have you ever been to the U.S.? If you ever been to the United States before, select YES, even if it was when you were younger. If that’s the case, the form will expand and ask for an approximate date and length of your visit. If not, select NO.
Have you ever been issued a U.S. Visa? If you already have another US VISA, like the Student (J) or the Tourism (B1/B2), select YES. Otherwise, select NO.
Have you ever been refused a U.S. Visa? If you ever applied to another VISA and it got denied, select it here.
Have you ever filed an immigrant petition? No.

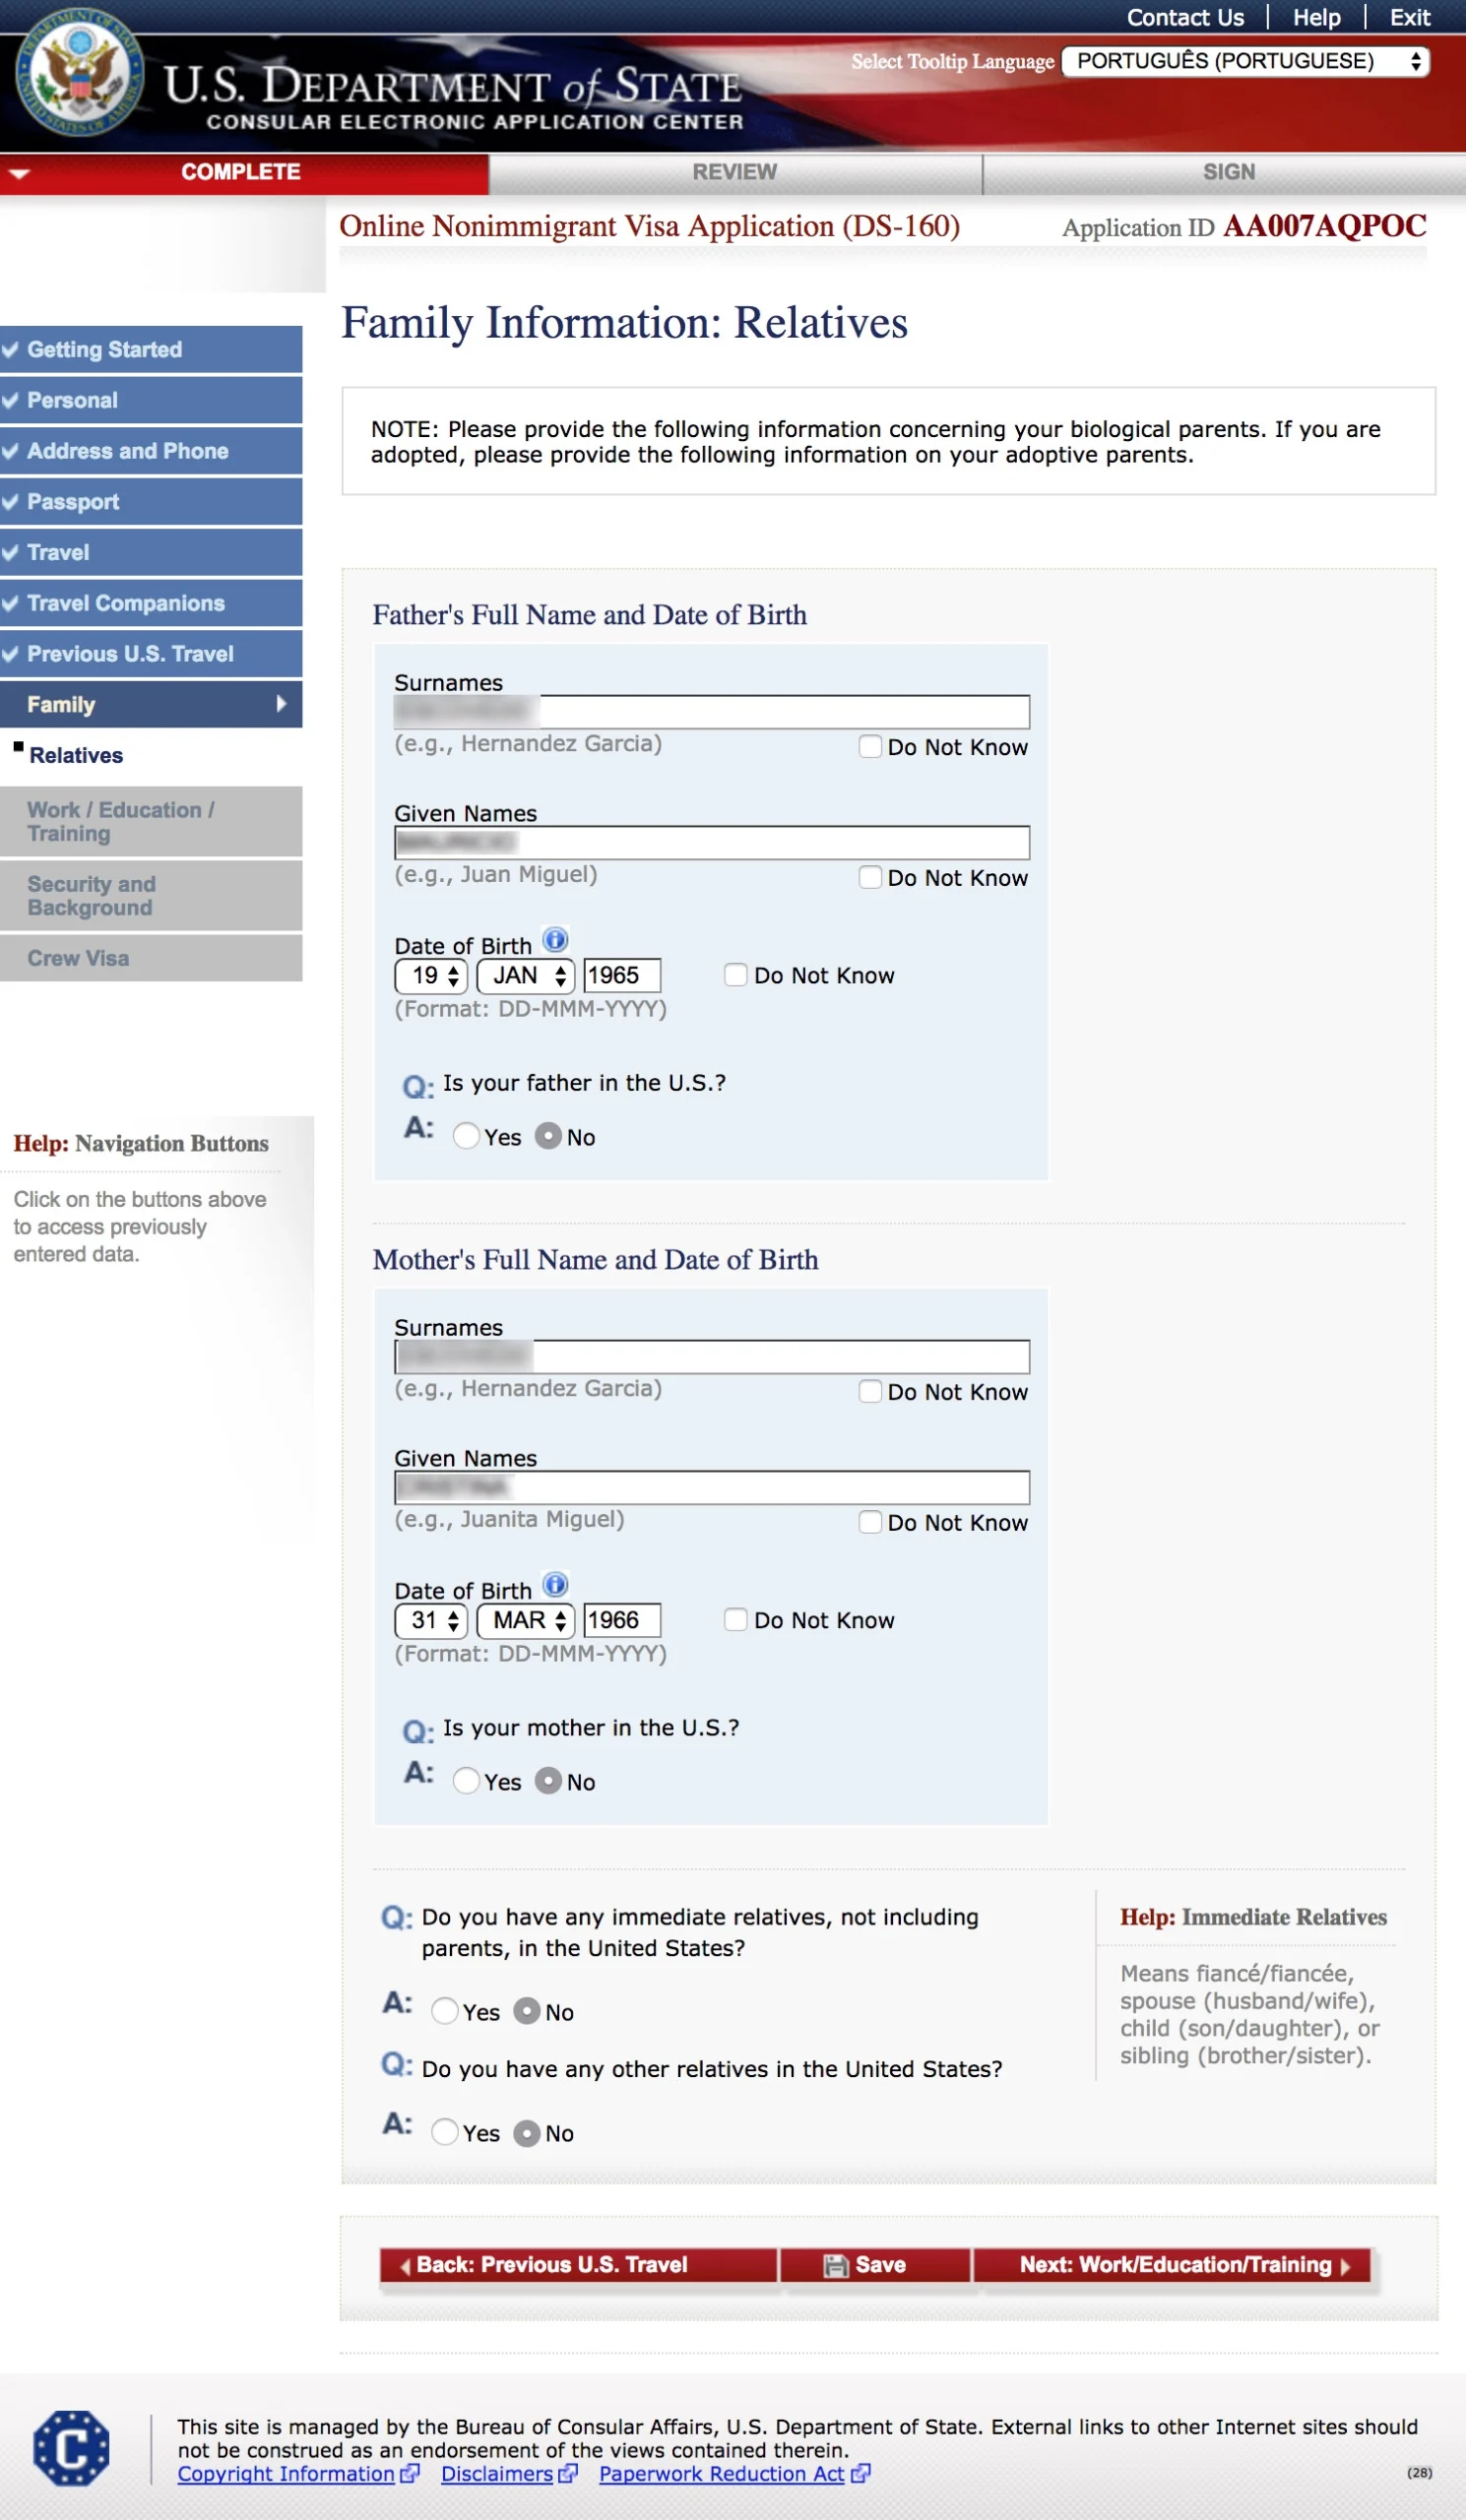
Family Information: Relatives
You will now fill out some information about your parents, like the full name, date of birth and if you have any of them living in the United States.
Do you have any immediate relative, not including parents in the United States? If you don’t have anyone from your family living in the United States, legal or illegally, select No.
Do you have any other relatives in the United States? No*.
NOTE: If you have any family or relatives living in the United States, legally or illegally, the consul will be able to see it on their screen, so don’t lie. If you lie, you will have the VISA application denied. If you do have relatives in the United States, the consul might ask you if/how you’re related to them, the last time you spoke to them or if you plan to visit.
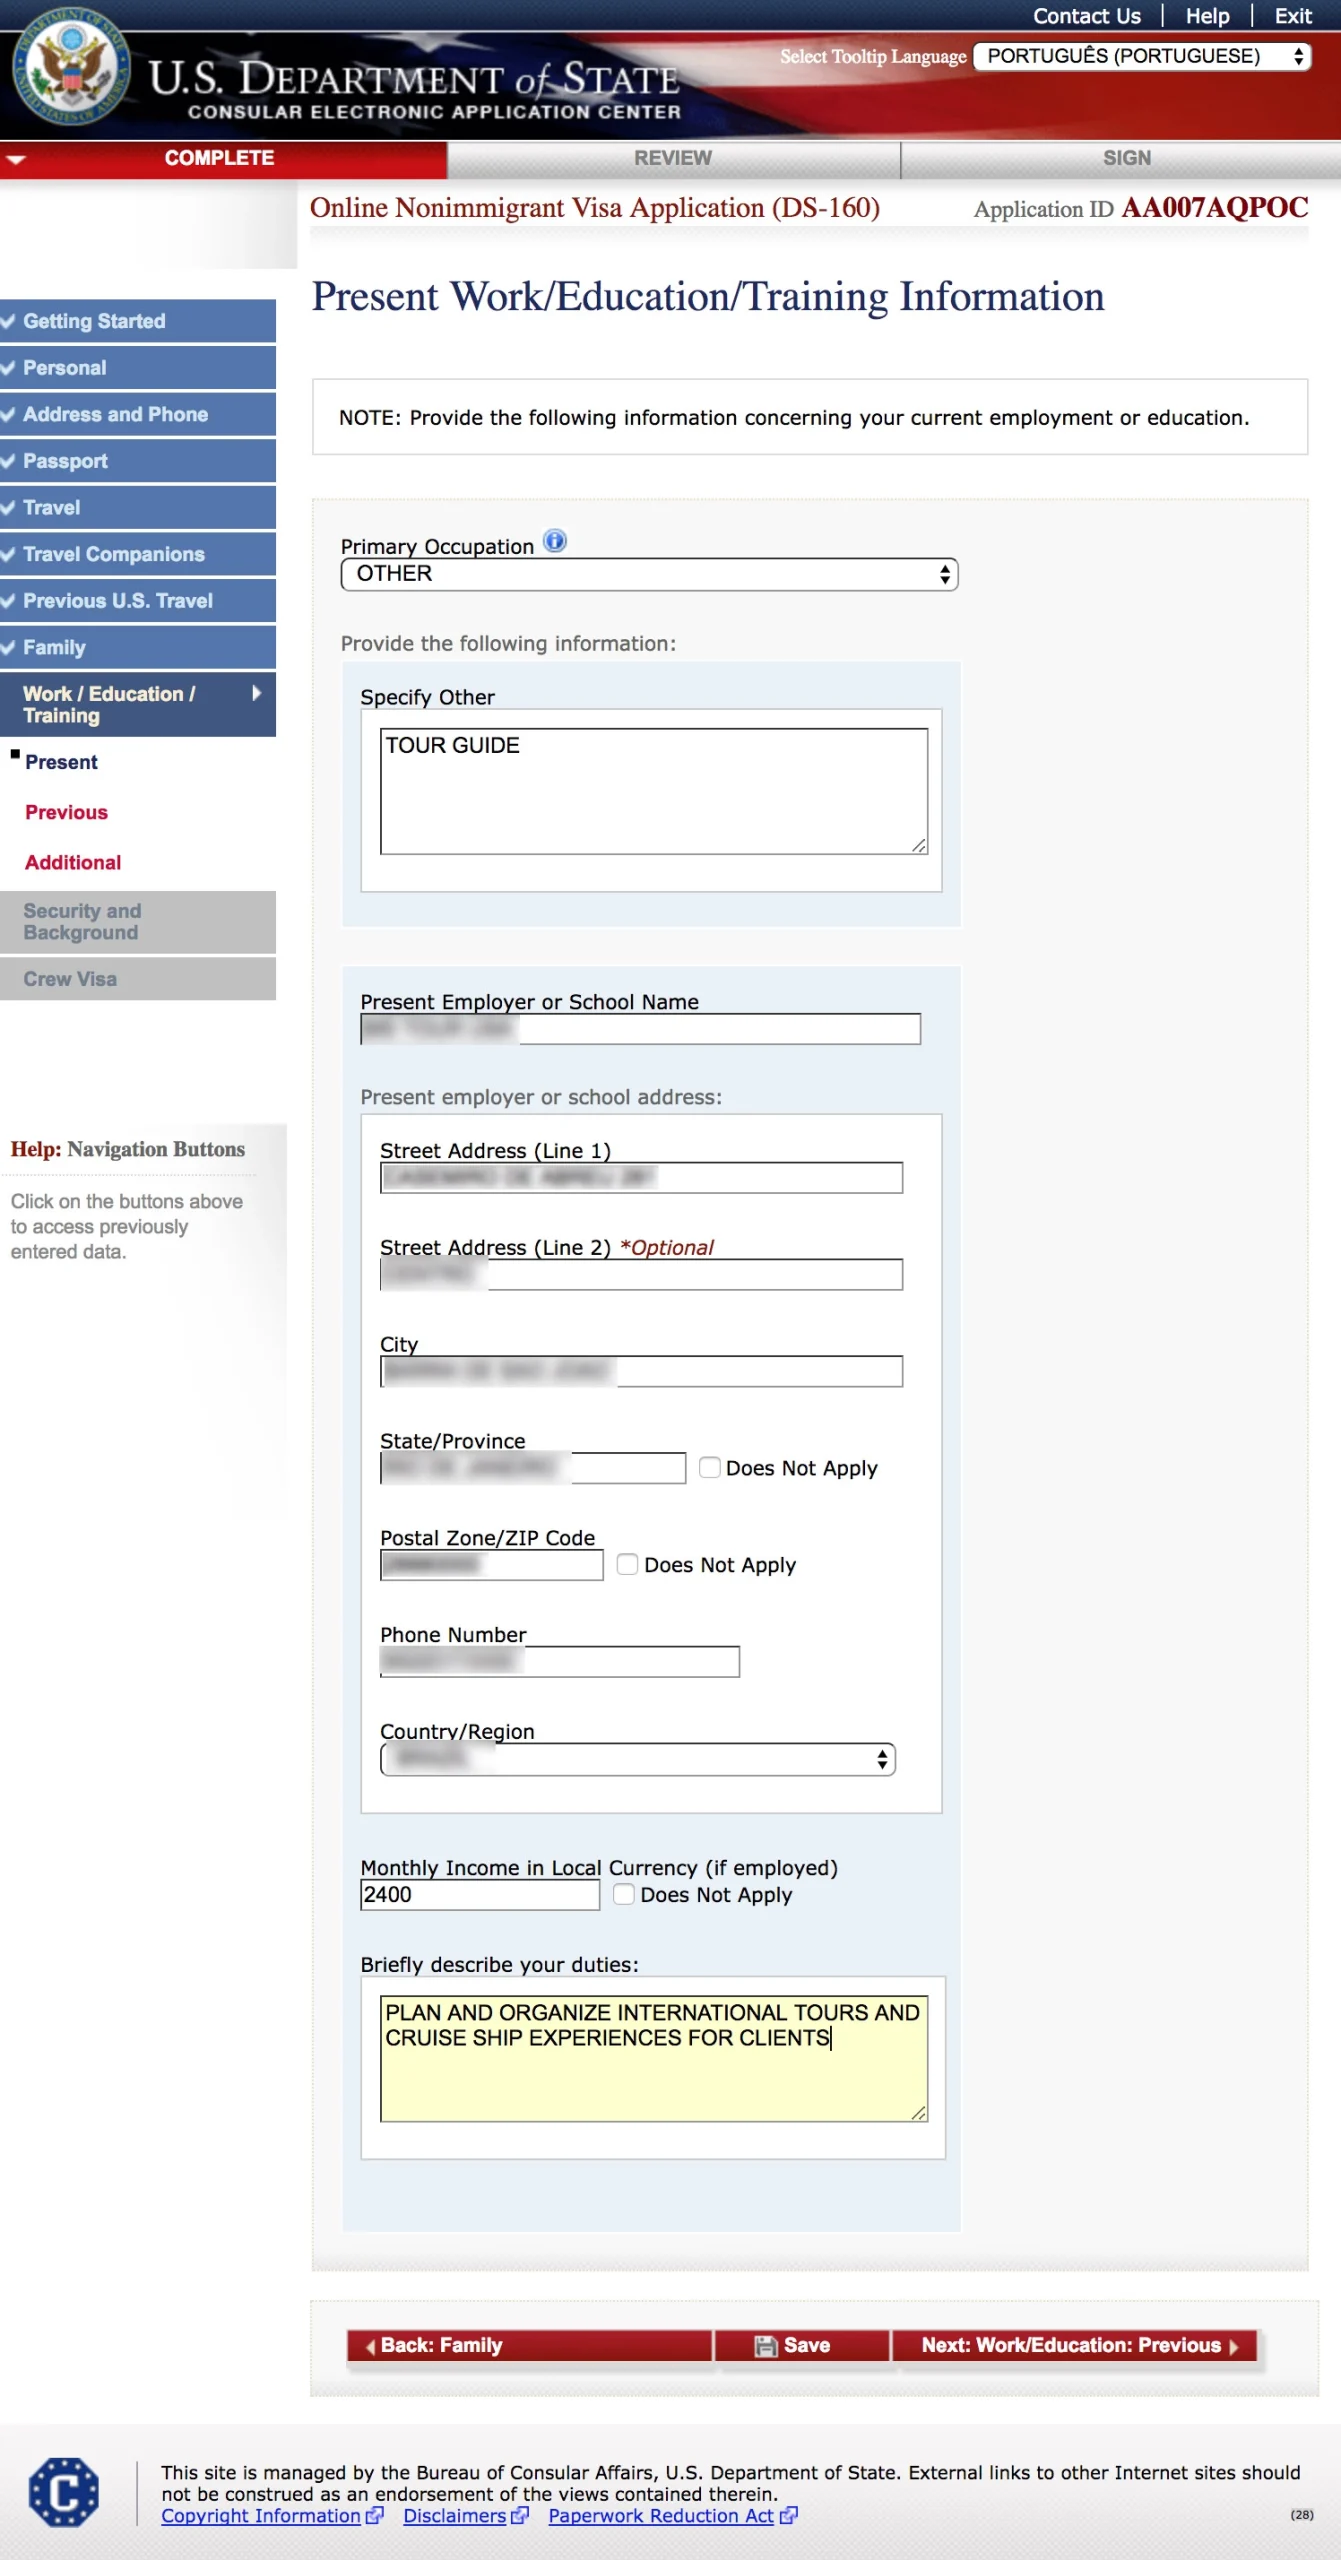
Present Work/Education/Training
In this section you will fill out some work related information, like your last or current job. If you don’t work but you study, fill out using your school or university information.
Primary Occupation: Select what’s your profession. If you don’t find it on the list, select OTHER and then another field will show so you will be able to type your occupation.
Present Employer or School Name: Choose to fill out as your work or as the place you study.
Monthly income in local currency: How much do you earn per month in your local currency. If you don’t work, select Does not Apply.
Briefly describe your duties: Describe what you do at work like “I work planning vacations” or in what field you study “I study medicine in the biggest private school in Spain”.
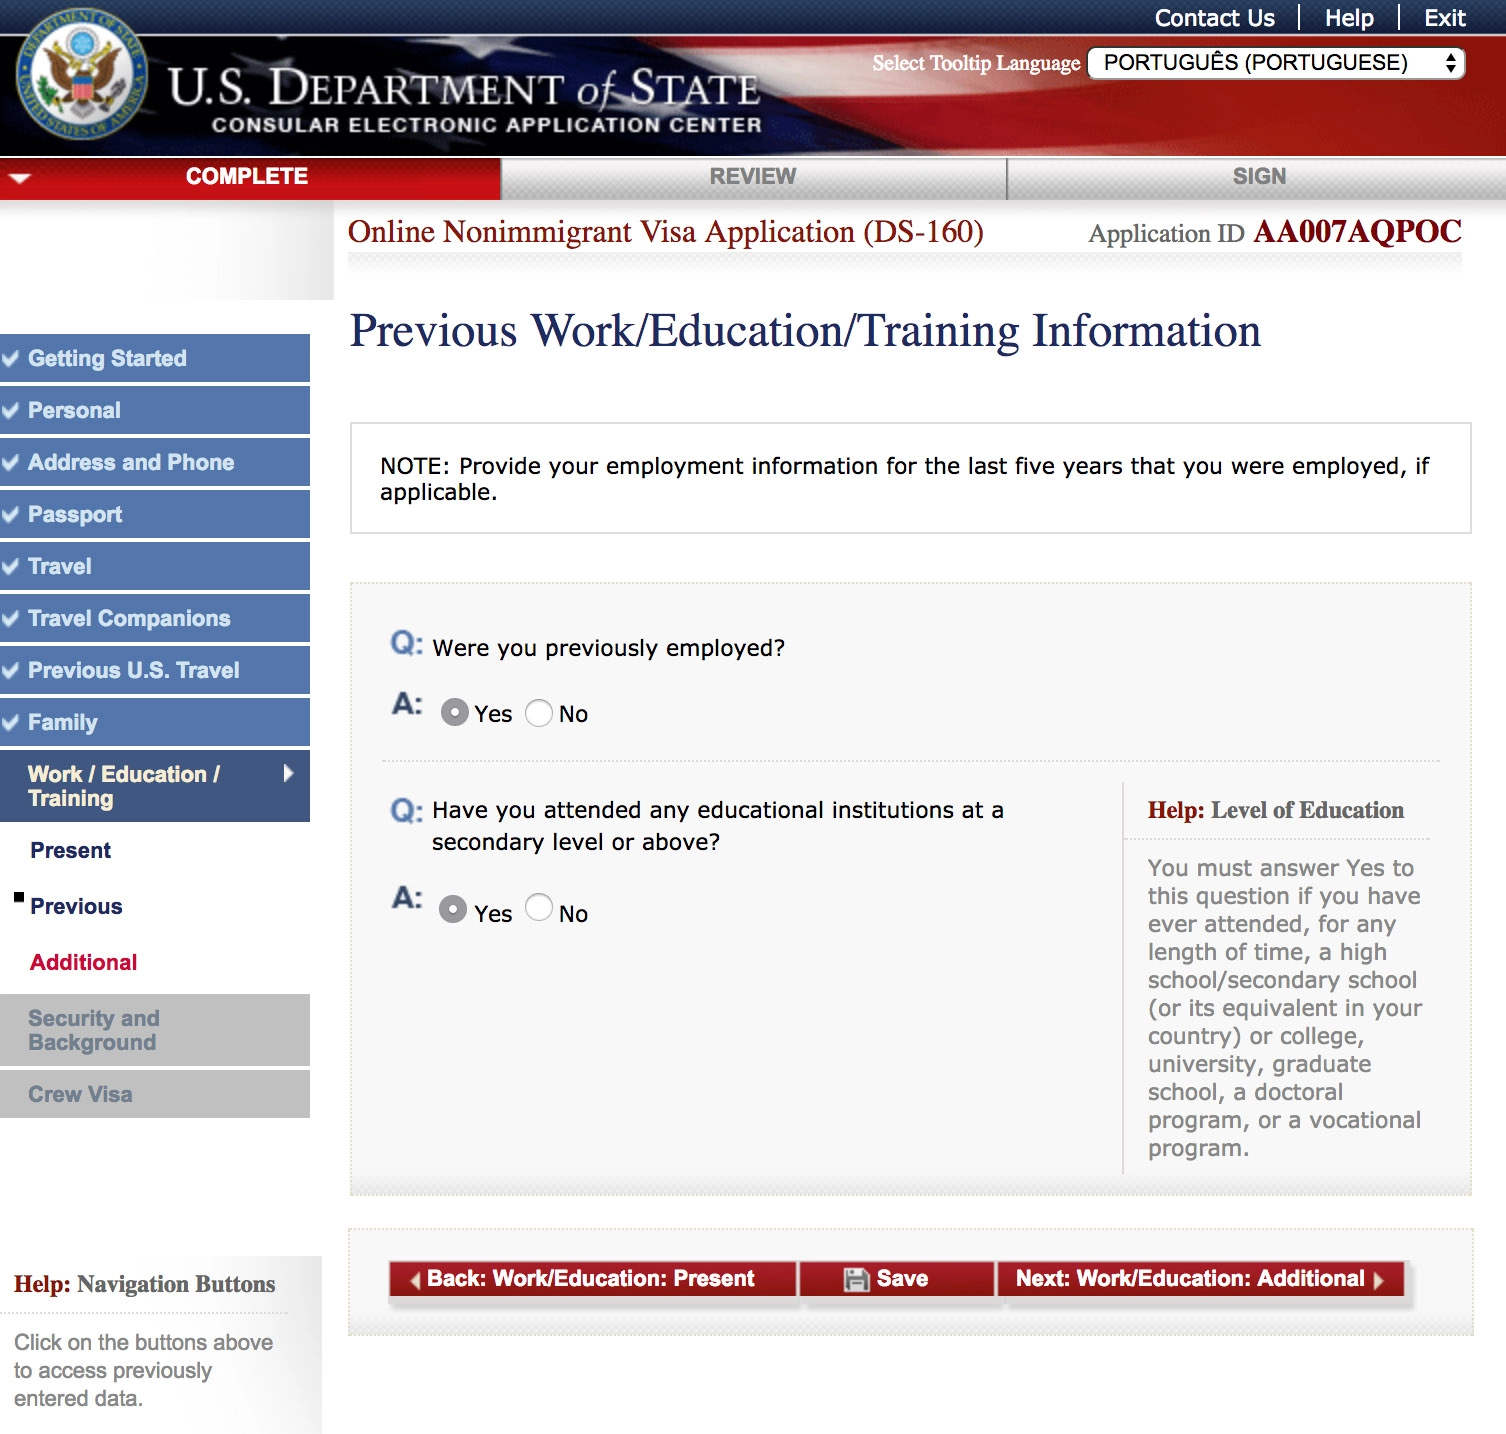
Previous Work/Education/Training Information
Were you previously employed? Select YES if you ever worked. Another field will open so you can fill more information about past experiences.
Have you attended any educations institutions at a secondary level or above? Select YES if you finished High School. Another field will show up so you can fill the information about your current university (if you’re studying) or the last one you attended.
Additional Information
Do you belong to a clan or a tribe? No.
Provide a list of languages you speak: Fill out with all the languages that you speak by clicking Add Another.
Have you traveled to any countries within the last five years? Select all the countries that you traveled to in the past five years. If you never left your home country, select NO.
Have you belonged to, worked in a charitable organization? Select yes if you ever belonged to a philanthropic organization.
Do you have specialized skills or training in firearms, explosives, nuclear and chemicals experience? Unless you have military experience, work with Nuclear energy or work as a Chemist, select No.
Have you served in the military? Select if you ever served the military in your country.
Have you ever served in … insurgent organization? No.

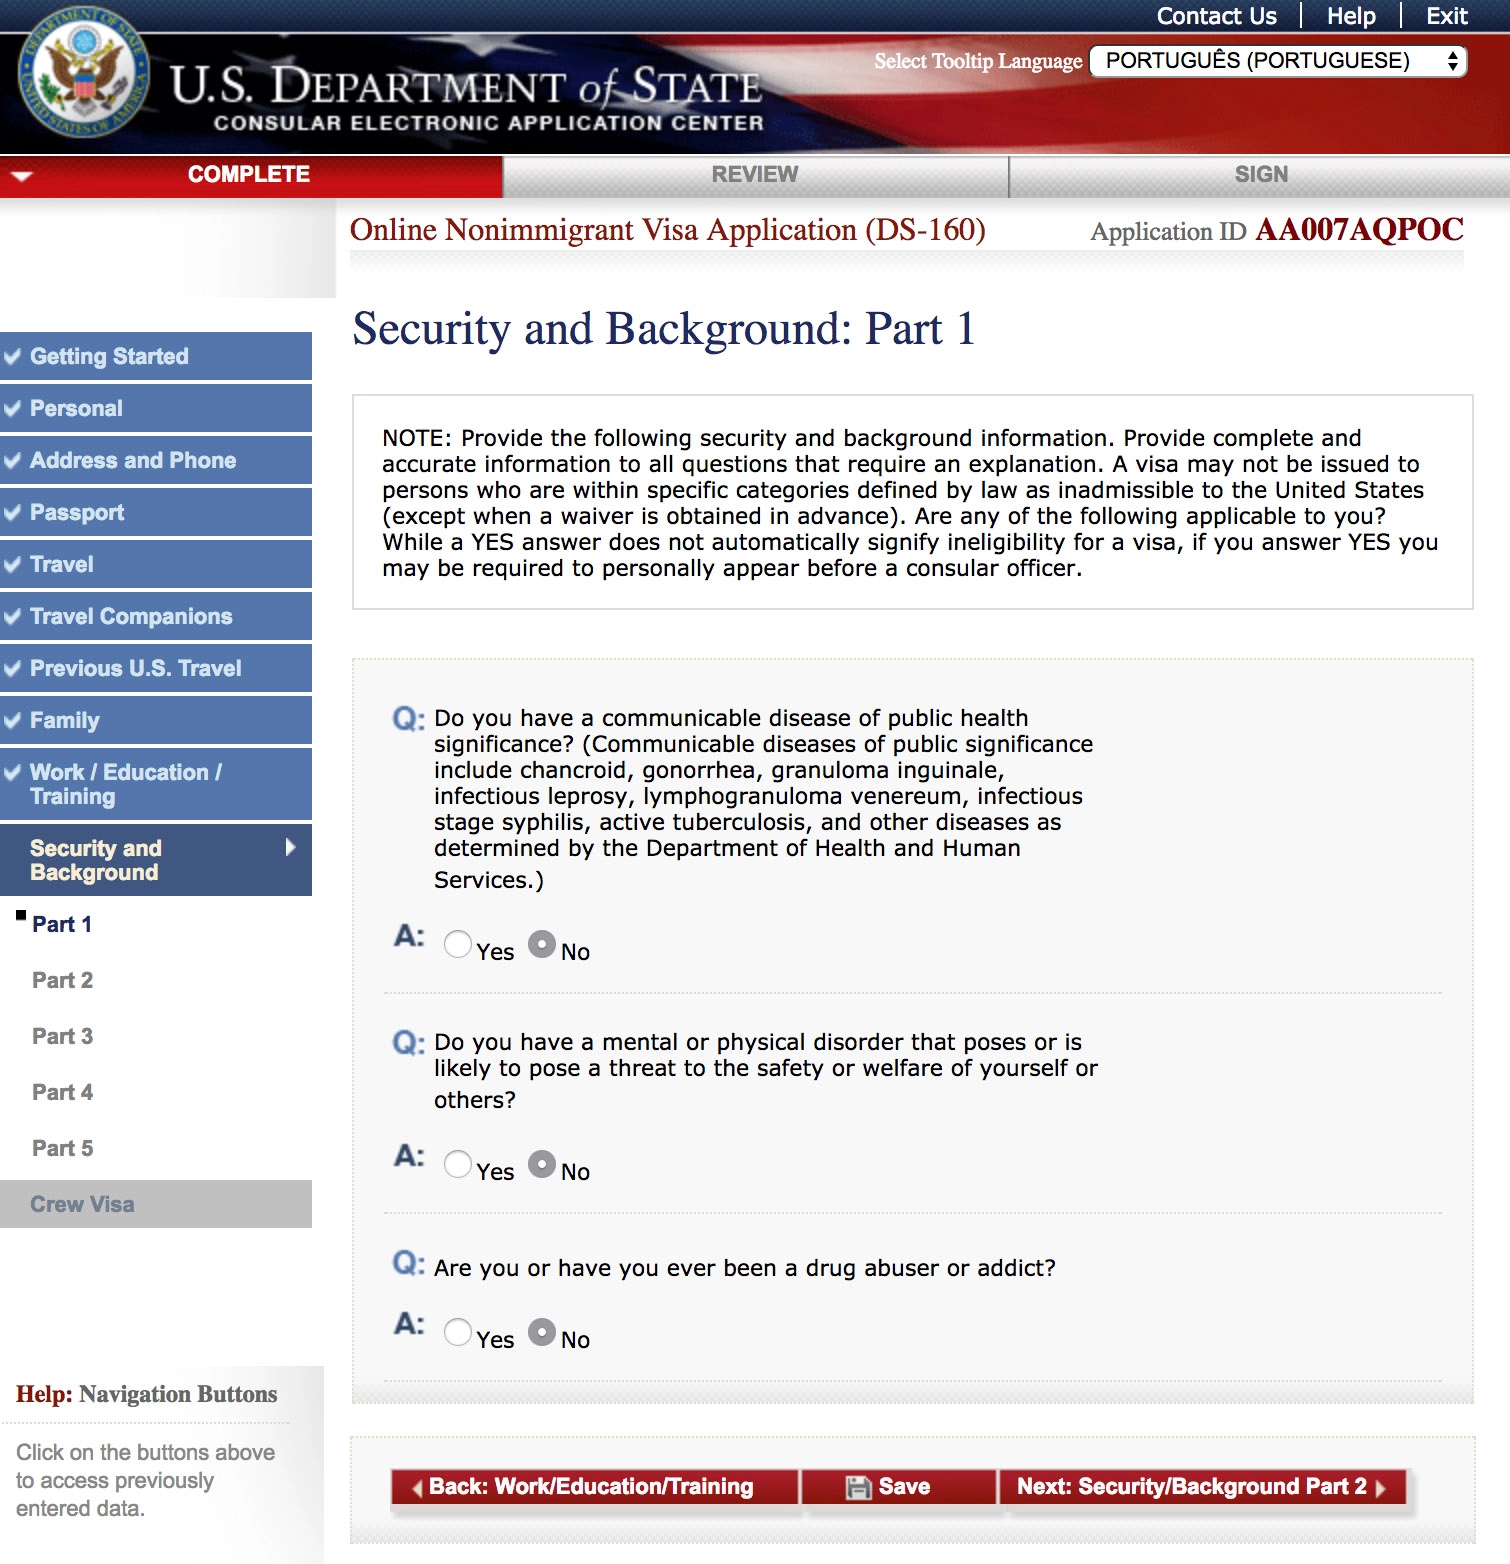
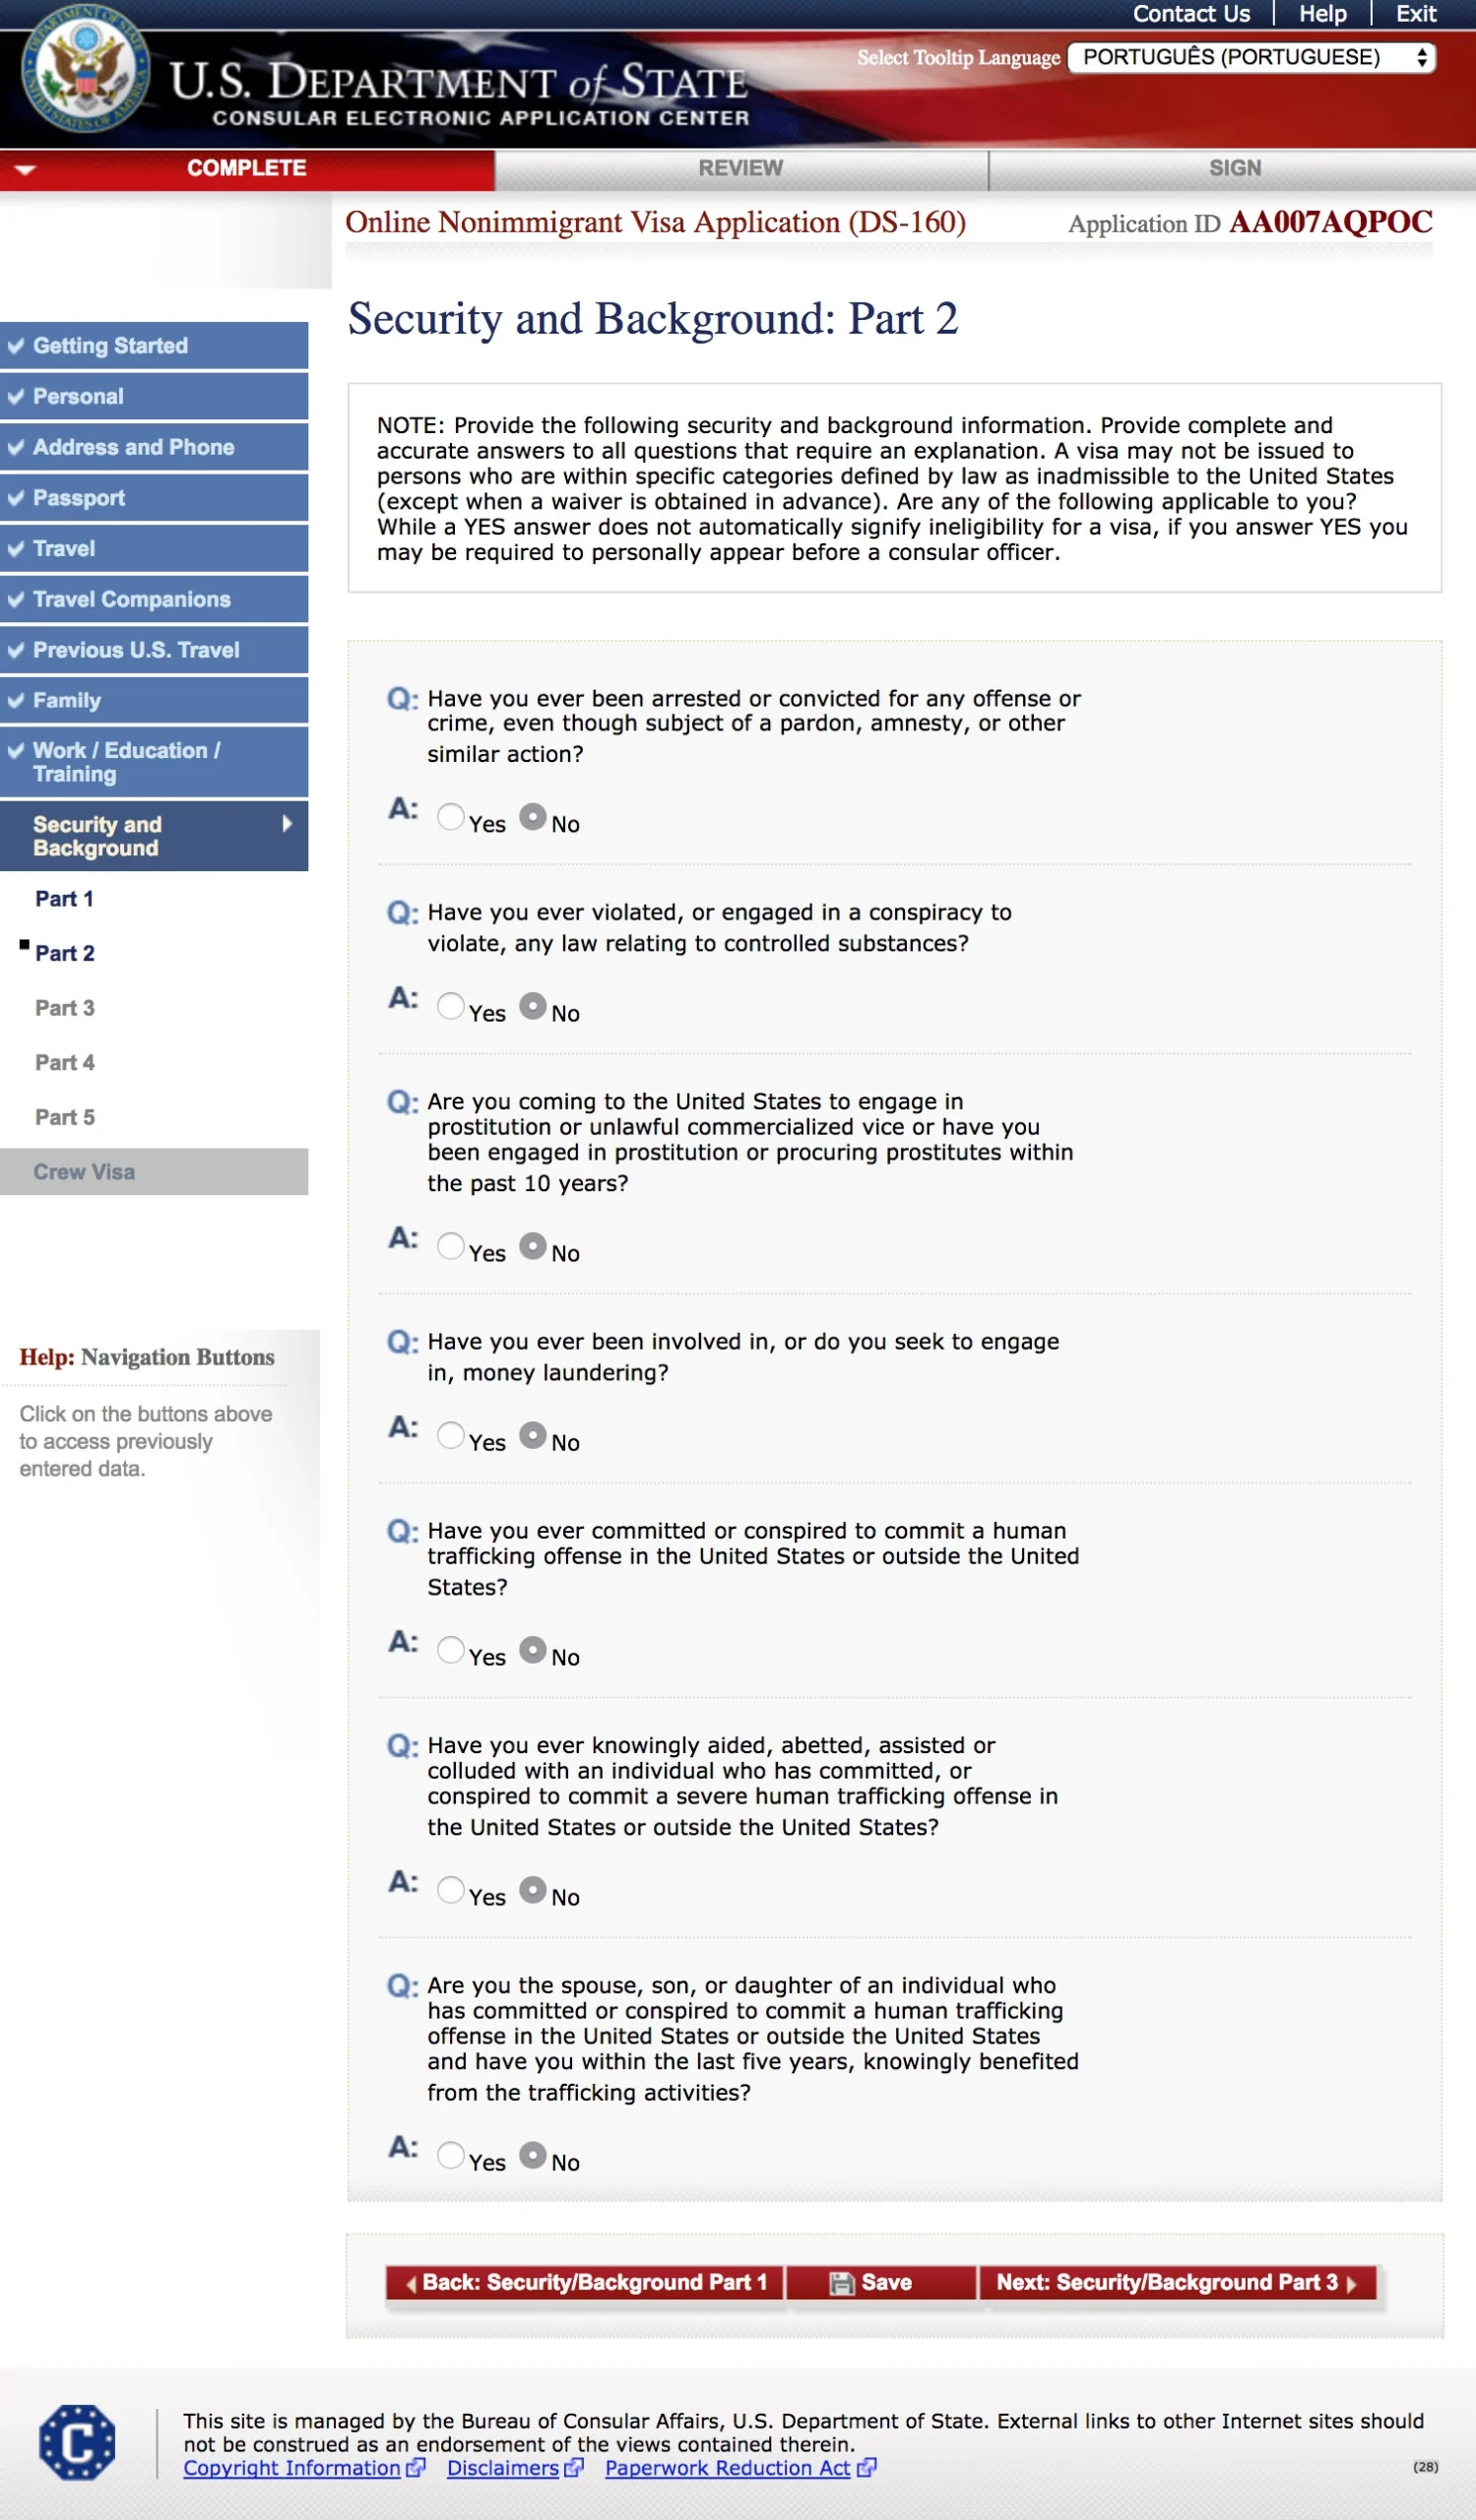
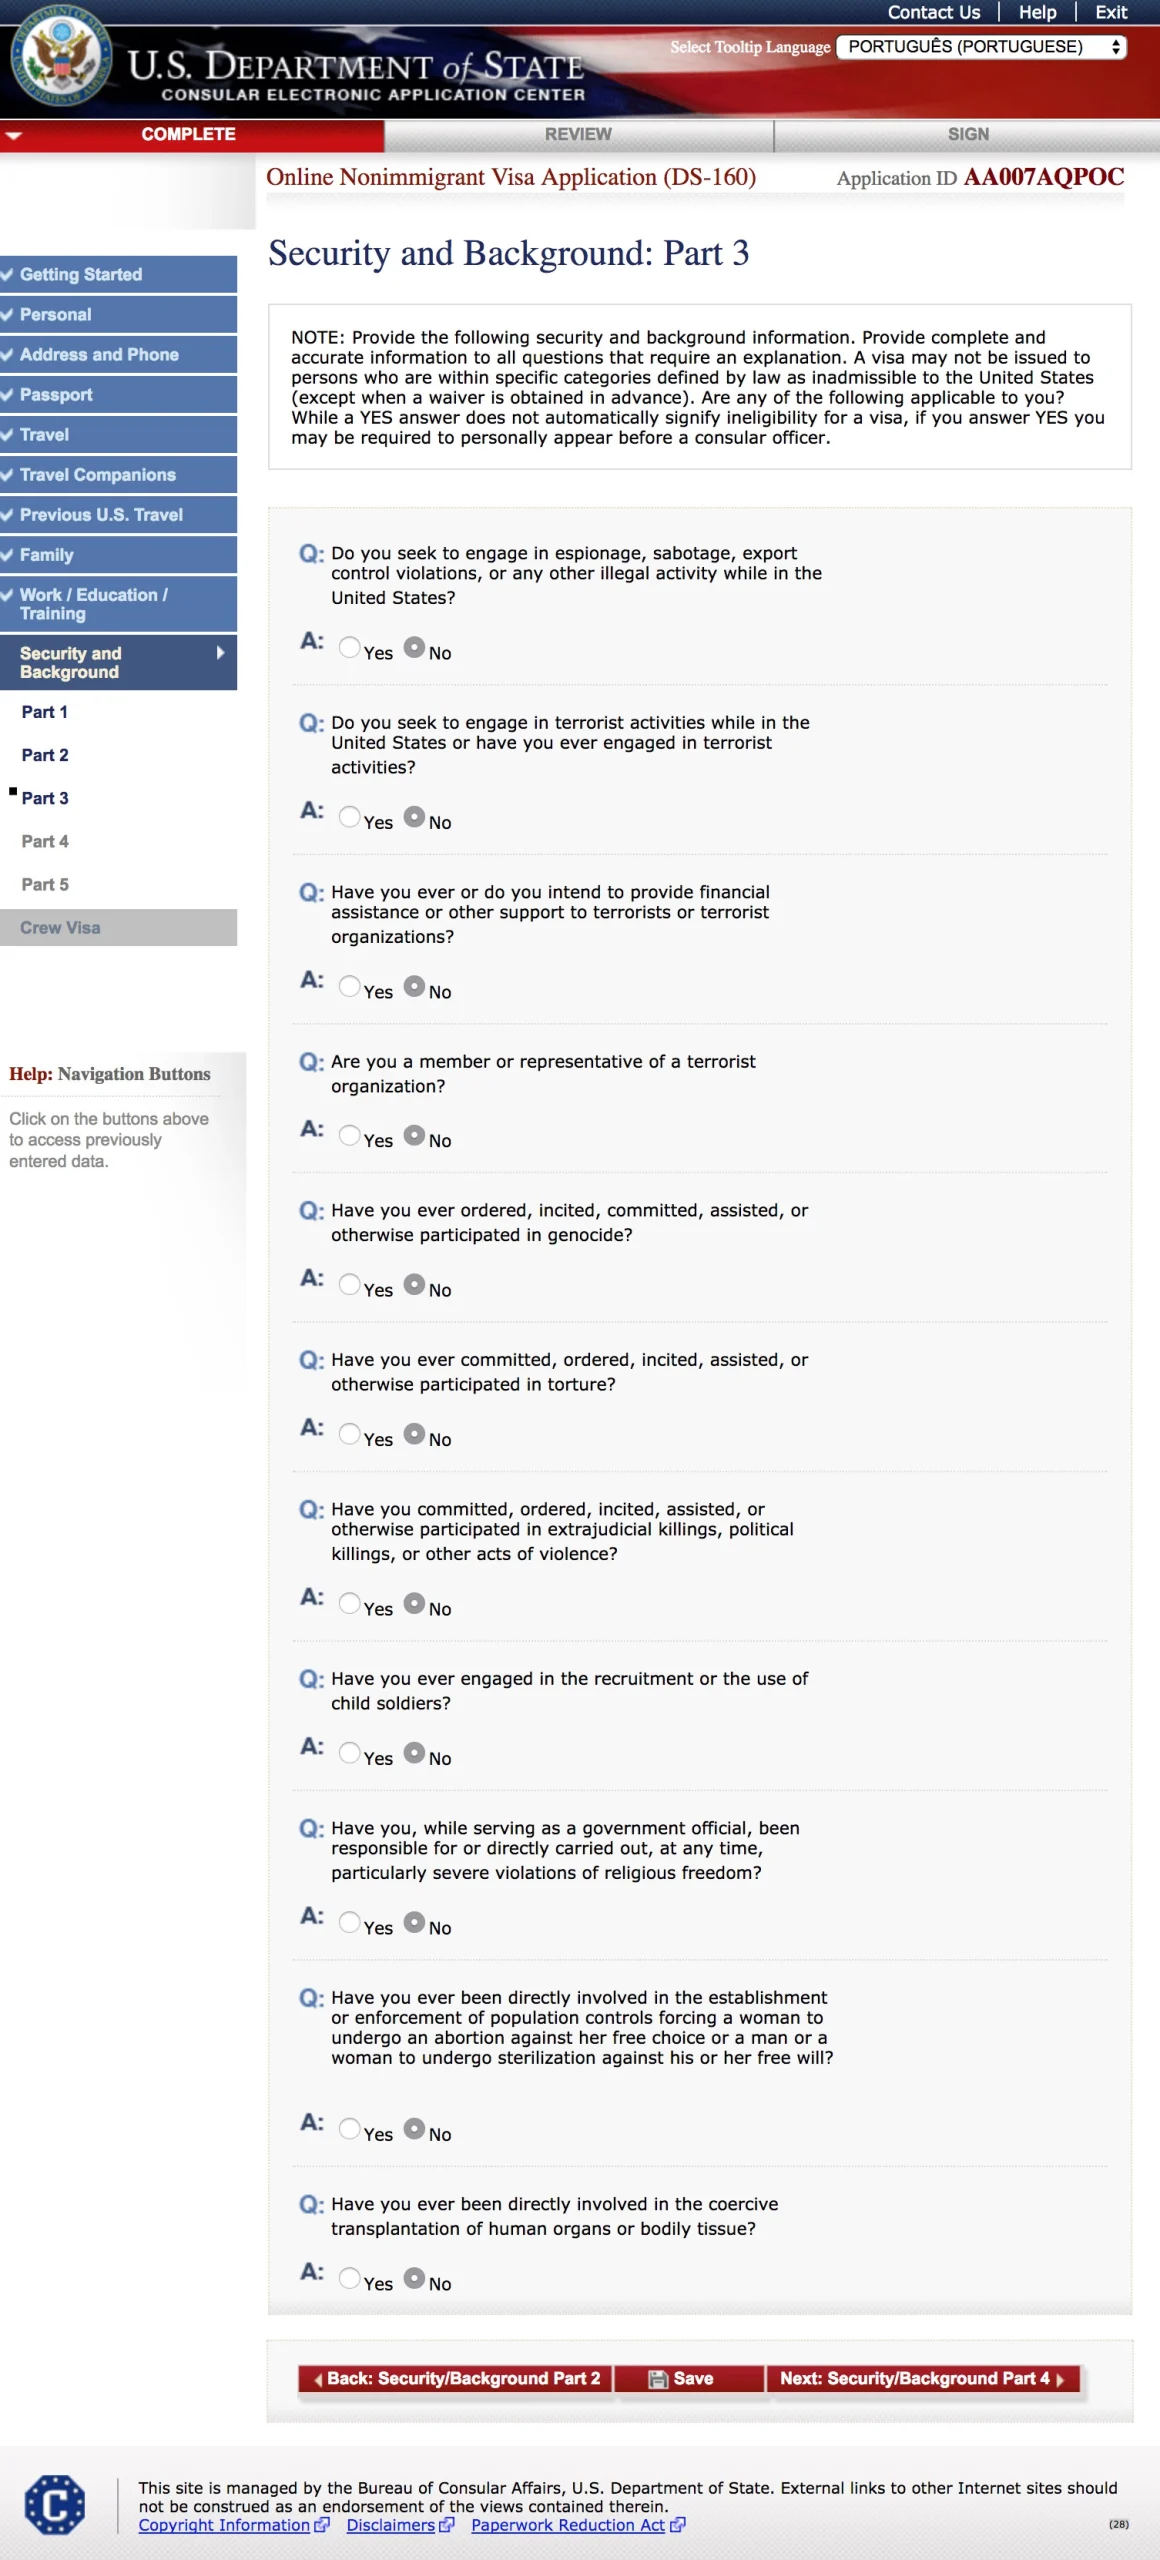
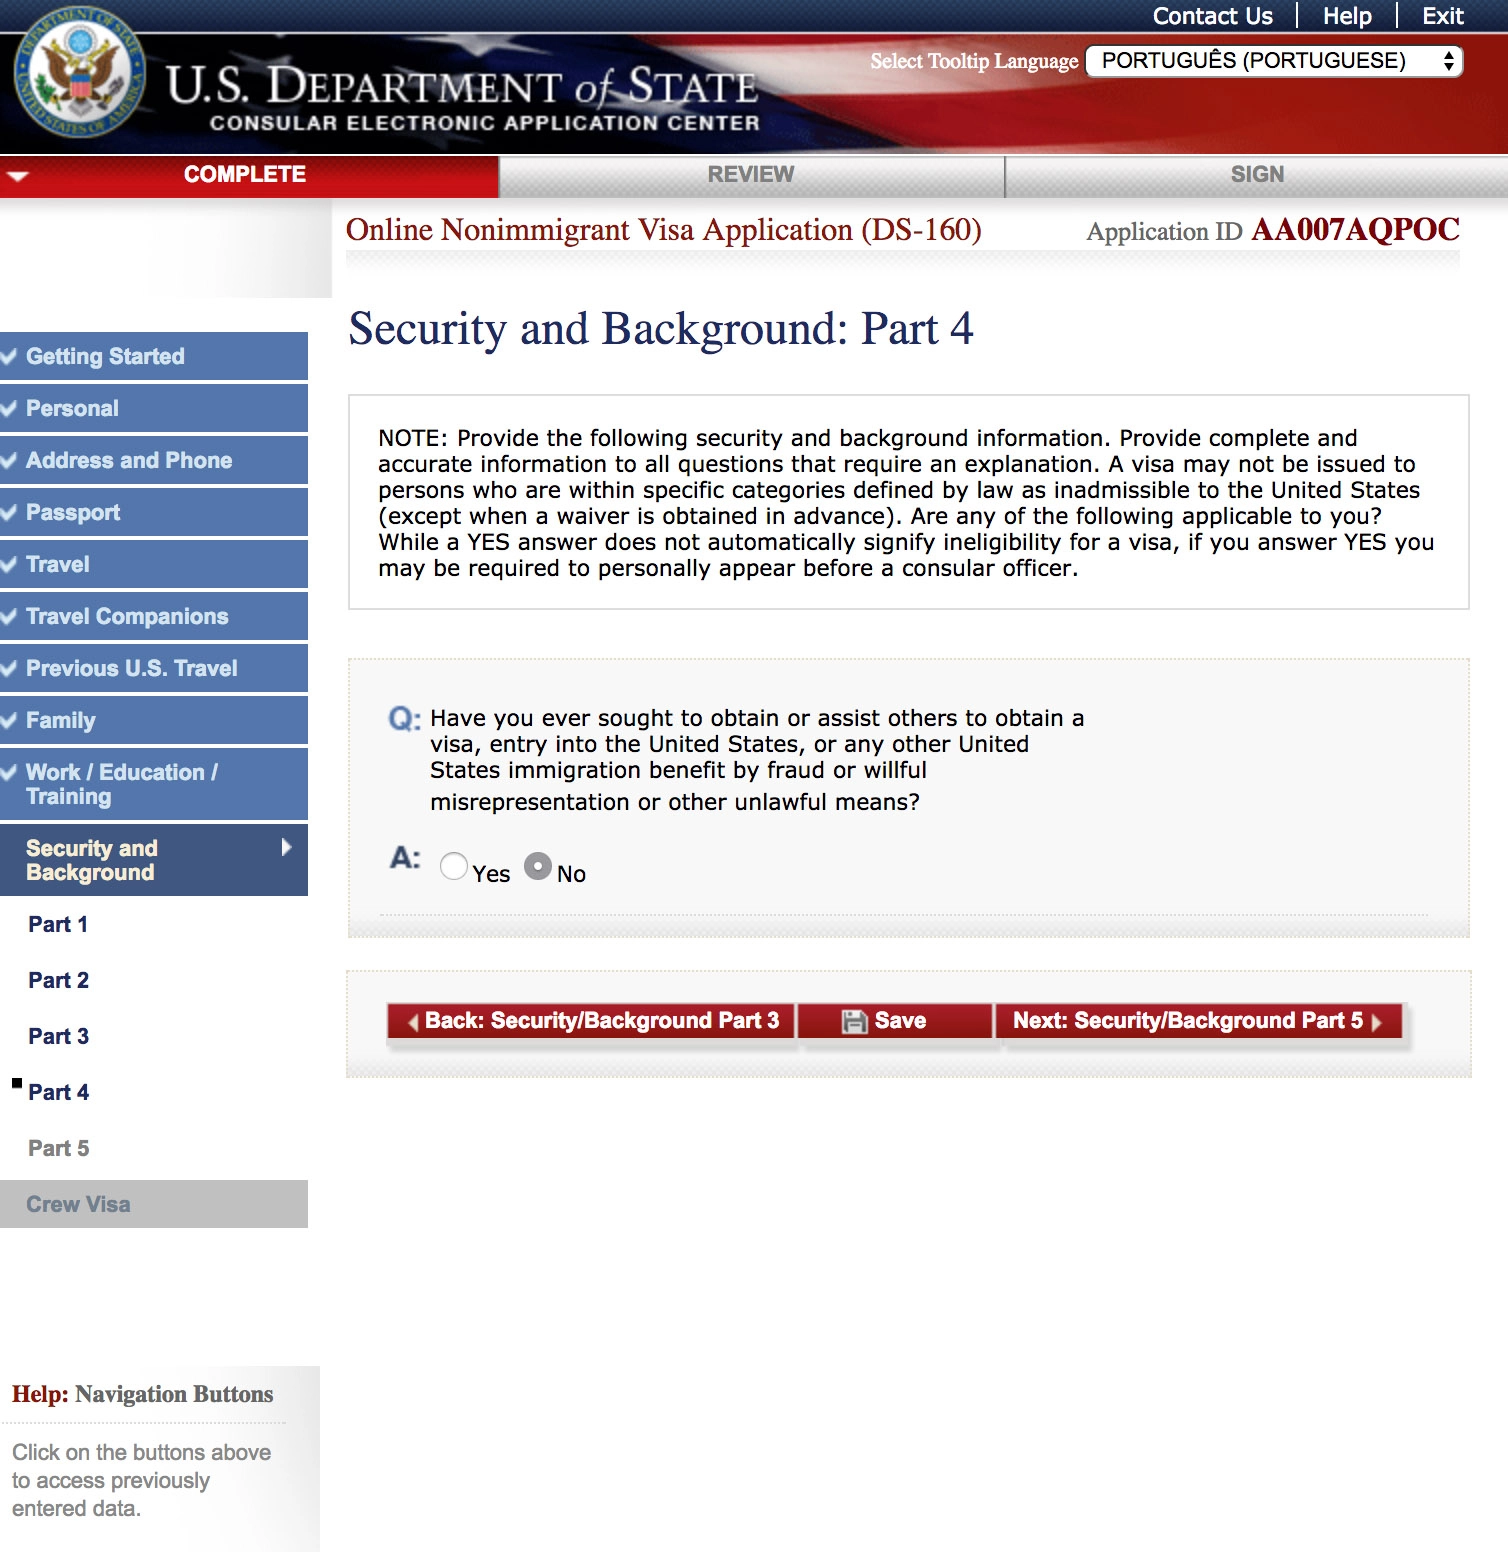
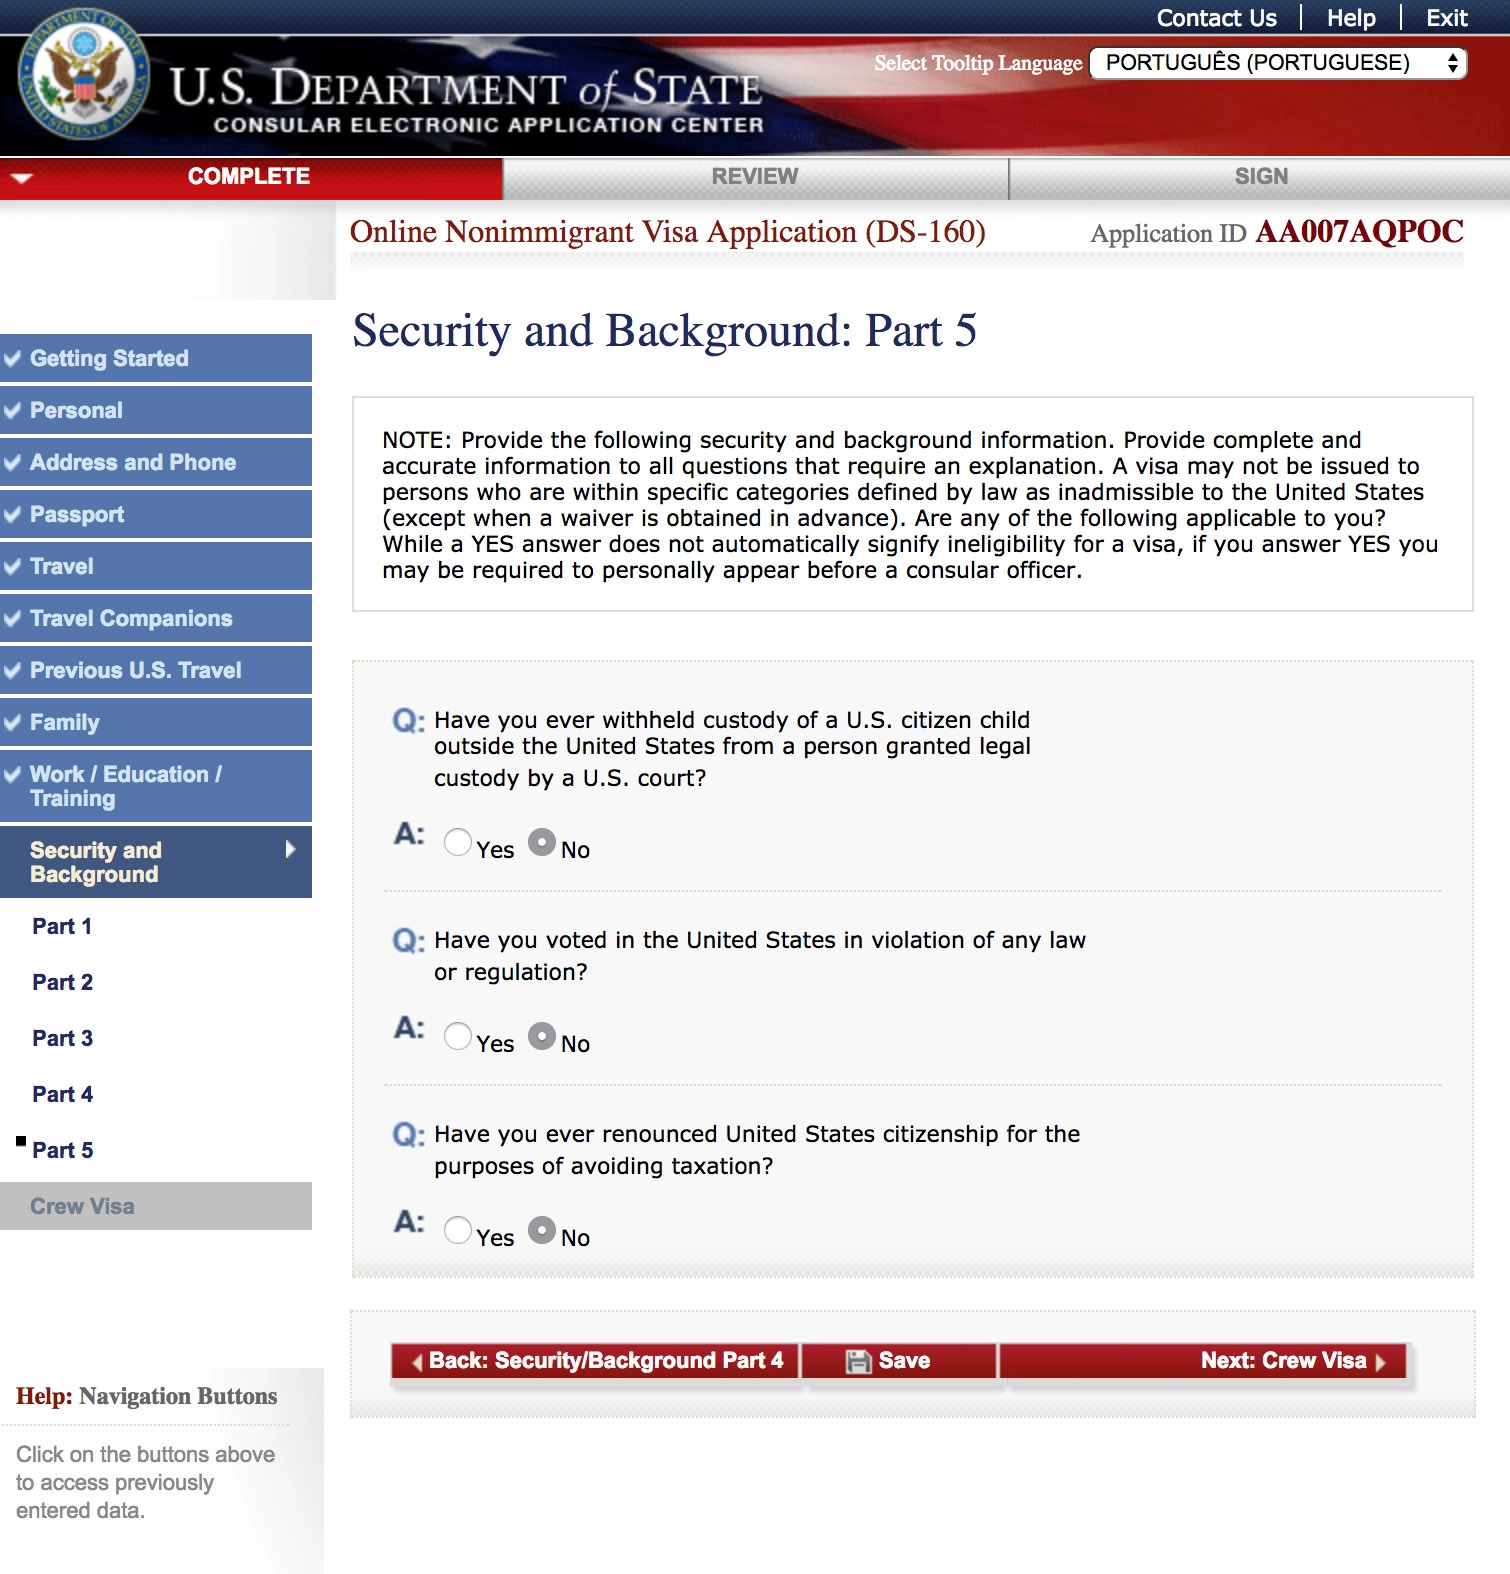
The next five pages are about Security and your Background Check so all the options should be selected as NO. They’re all related to terrorism, crimes, slavery and prostitution.
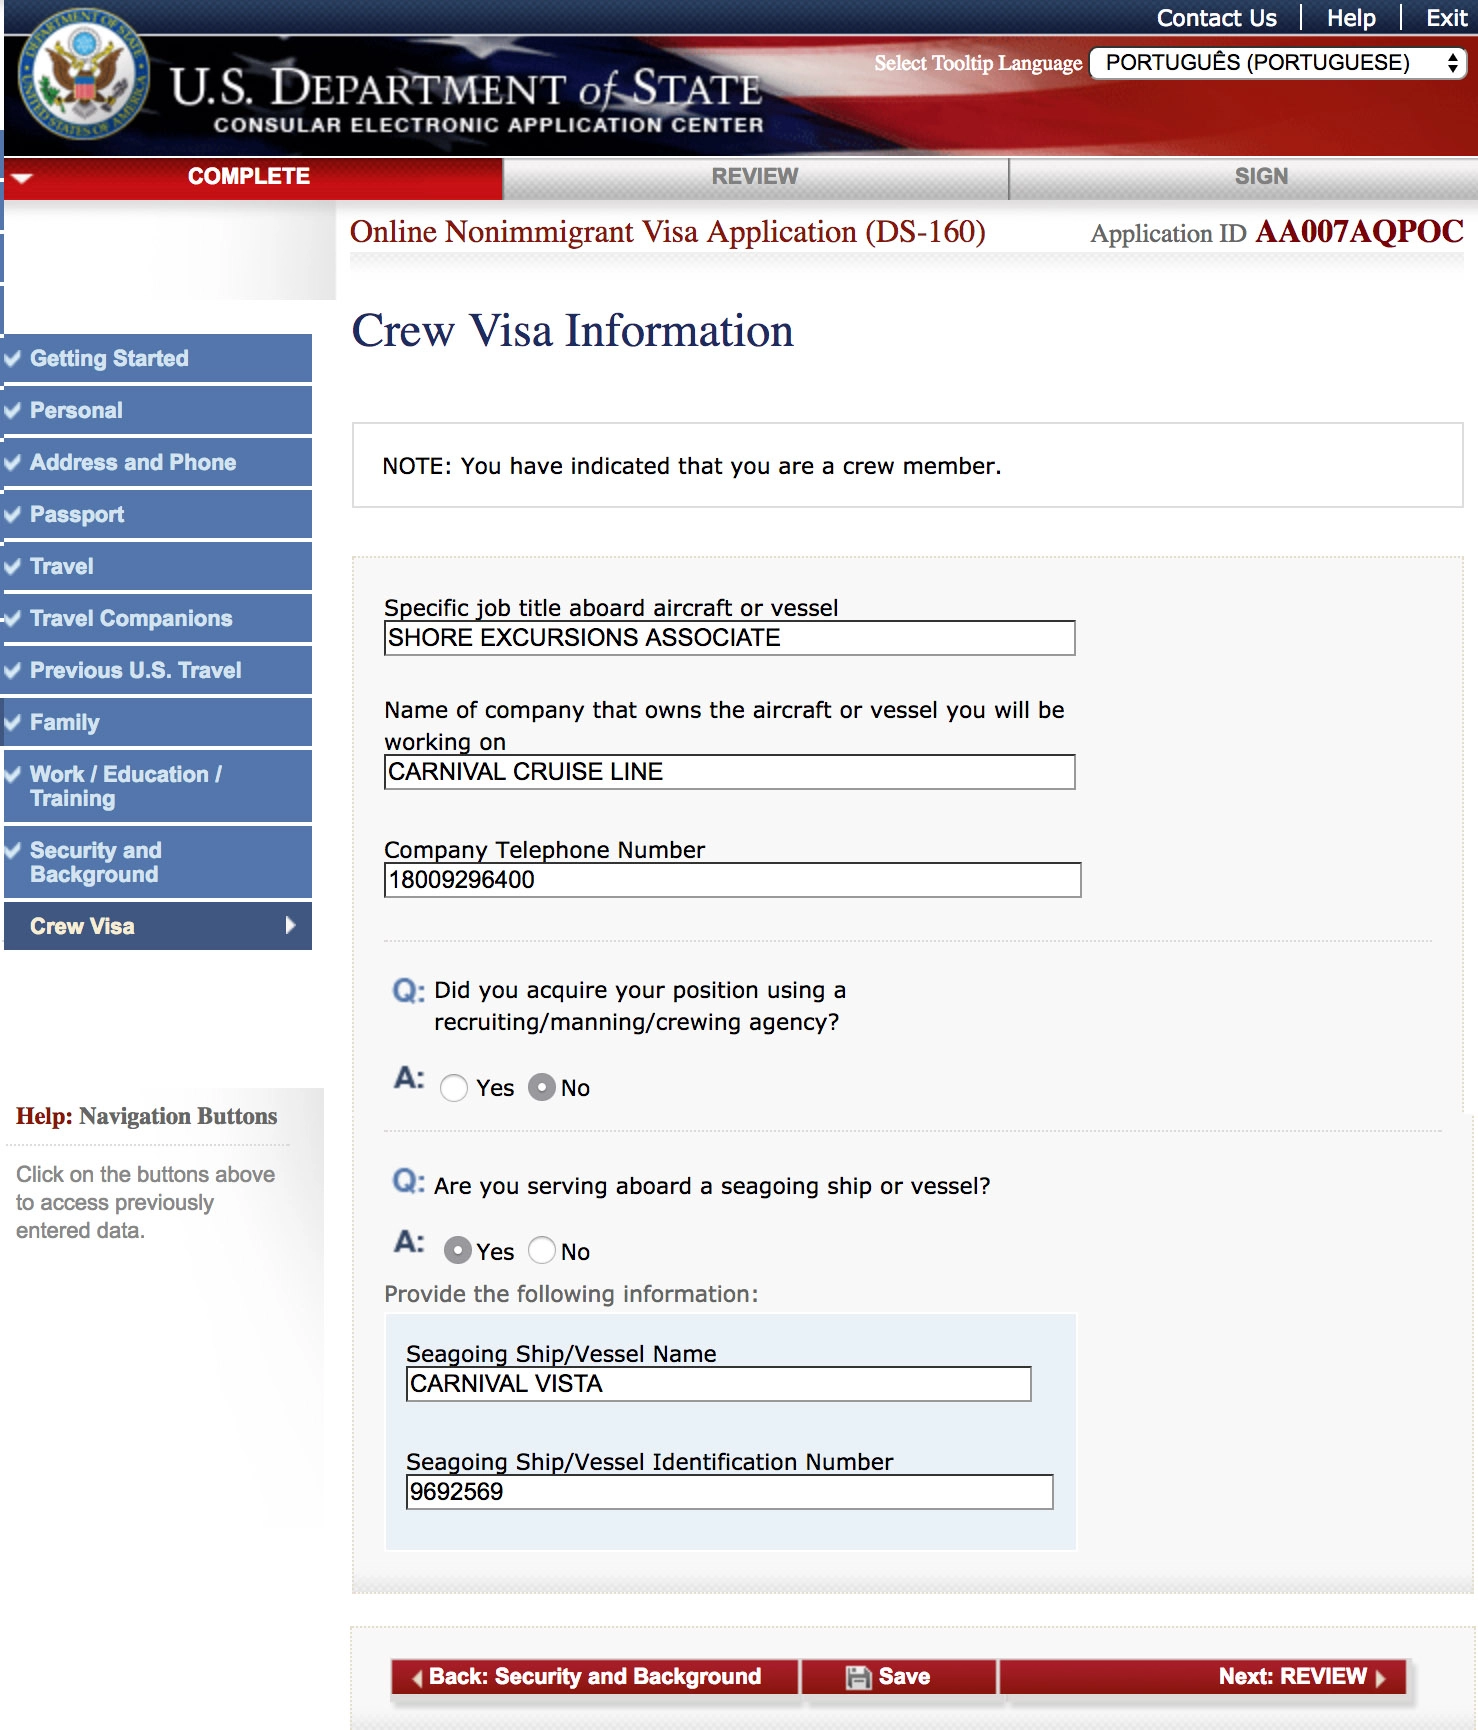
Crew Visa Information
We finally reached the end of the form, where you will need to fill some information about the company that hired you, along with the ship you’re joining and in which position. You will also need the company full address that can be found on the Letter of Employment and the company’s phone number, that you can find on Google or in other documents previously sent by the recruiter.
Did you acquire your position using a recruiting/manning/crewing agency? No.
NOTE: Even if you got hired by an agency, select no, as the agency is not responsible for you.
Are you serving aboard a seagoing ship or vessel? Yes
Seagoing Ship/Vessel Name: Name of your assigned ship (as the Letter of Employment says)
Seagoing Ship/Vessel Identification Number: IMO number of your ship. If not present on the Letter of Employment, check Google or the website MarineTraffic.
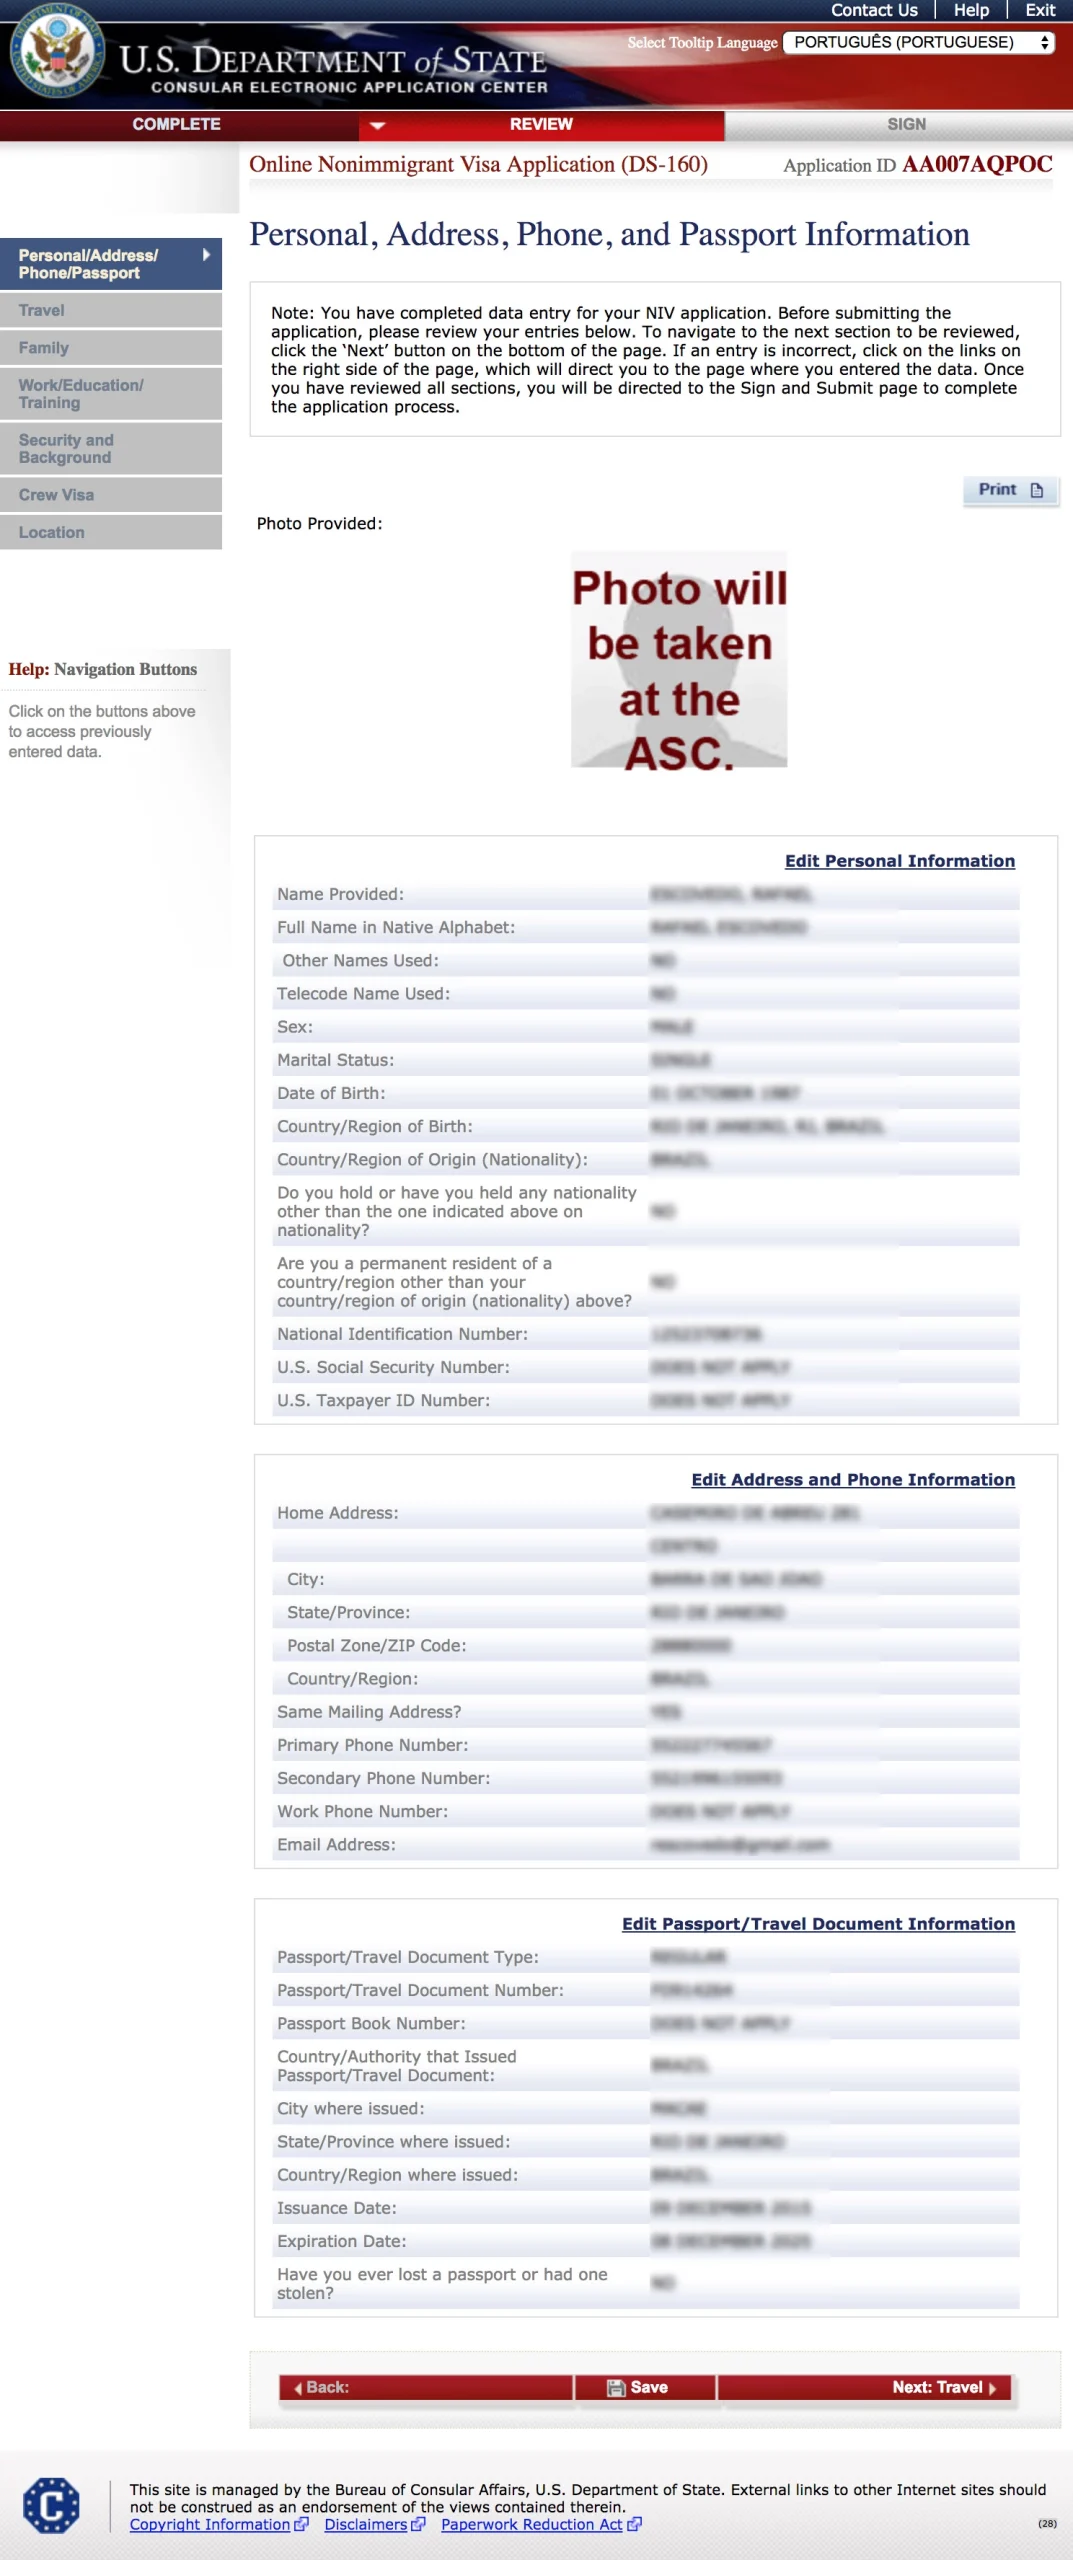
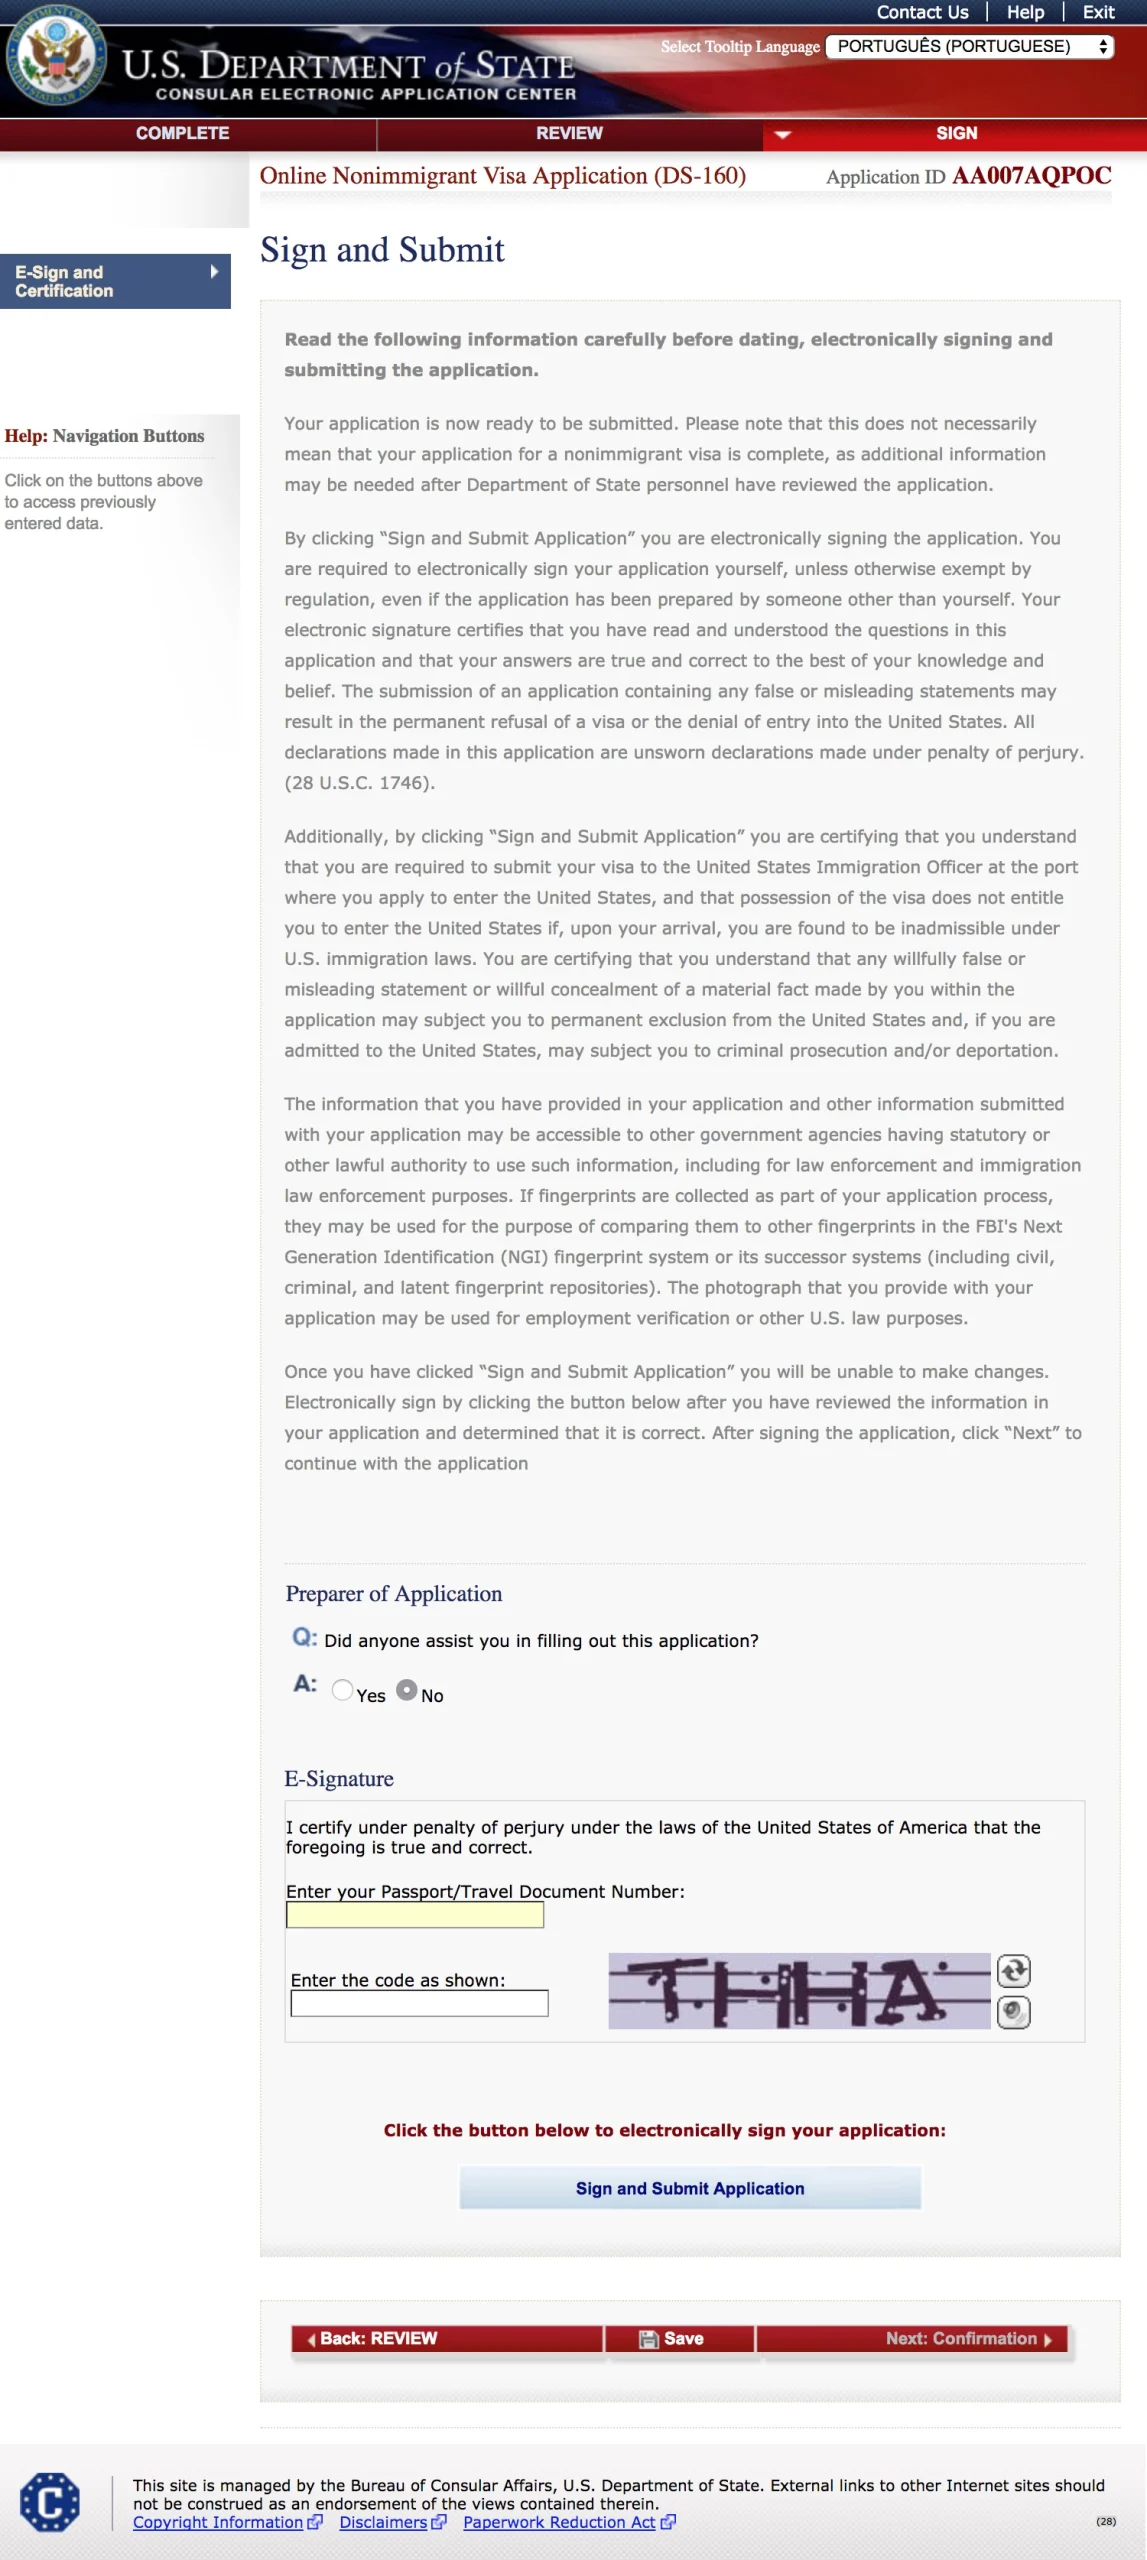
Review, Sign and Submit
Take your time to carefully review all the information you’ve entered on the DS-160 form. Make sure everything matches your official documents, especially your passport. You’ll notice the photo field is locked and this is completely normal, as your photo will be taken at the Application Support Center (ASC) during your appointment.
At the end of the page, you’ll be asked if someone assisted you in filling out the form. Select NO, as our website guide does not count as individual assistance.
E-Signature: Enter your passport number and complete the captcha (just like at the beginning) to electronically sign the form.
Once everything is complete, click “Sign and Submit Application.” Congratulations you’ve now finished the DS-160!
The next steps will involve accessing another website where you’ll create an account using your DS-160 Application ID, schedule your appointment, and pay the VISA fee of 180 USD.
NOTE: All cruise lines are required by international law to reimburse seafarers for the costs of any VISAs required for their employment. Keep the receipts!
Non-immigrant VISA Fee (MRV)
As you successfully completed the DS-160, it’s now time to pay the MRV Fee of 180 US dollars in order to schedule an appointment with the American consulate. After the payment is confirmed, you will be able to book your appointments. In most countries, there will be two: one at the ASC, where your photo will be taken and fingerprints collected, and another at the consulate, where you will attend an interview to verify your intentions.
You will receive emails from now on with the status of your application. These emails will also include a list of required documents you need to bring to the interviews, but the most important of these is the Letter of Employment provided by your company. Without it, you will not be able to obtain the VISA, so make sure to print a copy and keep it with you.